2015 Family Activities Guide for October and Halloween

1

eek's ideasOur friend, Eek the Owl, has shared with us some frighteningly fun ideas to make the Halloween season even more enjoyable.   He has the whole family covered: chefs, crafters, adventurers, and board game aficionados!  There’s something for everyone in our Halloween Family Activities Guide!  Feel free to take a gander and try out some of these activities with your family this Halloween season!  And be sure to subscribe to The Big Scare for even more ideas!

Any opinions expressed in the following article do not constitute an endorsement of any product or retailer.   The following is for information purposes only.  Any instructions are for information purposes only.  The Big Scare cannot guarantee you will experience the same results as we did should you opt to use these instructions.  Feel free to share ways to improve the instructions in the comments section below.  All activities should be conducted under adult supervision.

BEWITCHING BAKING

Our first wise idea involves everyone’s favorite holiday activity — baking.  And, as Eek points out, it’s not just for wintertime.  Halloween provides the opportunity to create all kind of creepy concoctions.  From cut-out cookies to brownies, they all make perfect October baking projects.

HALLOWEEN BROWNIES

While brownies are devilishly delicious by themselves, there’s just something even more appealing about a Halloween Brownie.  Making Halloween Brownies is just as easy as baking regular brownies.  You do exactly what your favorite recipe (or box) tells you to do, but you change up a few things before putting the batter in to bake.  Rather than just pouring the batter into a pan, you want to line the pan with greased aluminum foil.  Basically what you want to do is rip out a piece of baking foil and place it in your baking pan, pushing it up against the sides, making sure the whole thing (meaning the entire bottom and all the sides) is well covered.  Press the tin foil against the sides of the glass or metal pan so that it hugs it and assumes the pan’s shape.  Ensure that there is enough room left to lift the foil up out of the pan when the brownies have baked.  Then proceed to grease (and flour) it as you normally would or as you are instructed to in the baking directions, so as to prevent the brownies from sticking.  Bake the batter as directed.  Remove from the oven and let set until cool.

Rather than cut the brownies in the pan, you are going to remove the entire brownie cake, hence the foil.  Once cooled,  you can remove the brownie cake by lifting the sides of the aluminum foil or turning the pan upside down, a method preferable in cases of wide pans.  Place the brownies on a clean surface covered in powdered sugar and remove the foil lining.  Your brownie cake should have maintained its shape.  (If at anytime it appears that your brownie cake may be breaking, consider cutting the brownie cake in the pan and removing it in smaller portions.)

Now comes the fun part.  Take some open  Halloween cookie cutters (meaning ones that are just outlines that do not have tops which would prevent the cutter from cutting through thick brownies) and cover them in powdered sugar.  (Make sure your cookie cutters are deep enough to cut through the thick brownie cake.  You can buy these cookie cutters at a number of major retailers.  They usually come in “tubs.”)  Press each cookie cutter all the way through the brownie cake, just as you would with cookie cutters in cookie dough.  Carefully remove your brownie shape and place it aside.  Continue to press cutters into the remaining brownie cake until the area of usable brownie cake has been cut.  Take the cutout shapes and decorate them with frosting, powdered sugar and candies.  Use the “scrap” brownies, the unused edges that are leftover, to add layering and detail to your treats — or just eat them!

GRISLY GAME NIGHT

In a world seemingly run by electronic entertainment, it’s sometimes hard to remember that other forms of fun exist., like board games!  And when those board games have a Halloween theme, their fun level quadruples.

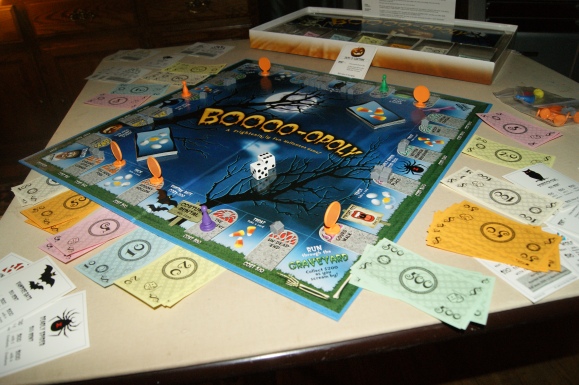
There are a number of Halloween-themed board games available on the market, and plenty more that can be purchased secondhand.  One of the easiest games to track down is Halloween Boo-Opoly.  Much like the game from which it derives its objective, Boo-Opoly allows players to buy properties, many of which will be familiar (like Elm Street) and many of which will be new (Gourd Walk).  The old railroads are now different creatures of the night, and the utilities consist of Jack-O’-Lanterns and Witch’s Brew.  Instead of houses and hotels, players may buy Haunted Houses and Full Moons.  The gameplay is quite similar to Monopoly, but there are some slight differences.  Overall, it’s a fun game with a nice design.  The only thing that would make it better would be if the playing pieces weren’t just plain plastic pawns, and instead were shaped in the forms of Halloween characters.

And if Boo-Opoly isn’t quite your game, there are plenty of other options.  From vampire games to zombie games, a trip to the local toy store is certain to reap a nice harvest of spooky entertainment — especially at Halloween.

FROM TRIP TO TREAT

WHAT’S IN A PATCH?

Most families pick up pumpkins from their local grocer (or the super-center which has invaded their neighborhood).  And while it is great to have access to affordably-priced pumpkins, there is just something missing from the experience.

So, while you may opt to get your larger carving-friendly produce from the grocery store, a trip to the local (or not-so-local) pumpkin patch should be in order for your family this year, even if you don’t make your big pumpkin purchase there.  Not only do many patches provide fresh, right-off-the-vine pumpkins, they also provide a ton of activities for your family.  The experience that pumpkin patches provide is unprecedented.  Many of them have games, hayrides, corn mazes, and photo opportunities that the grocery store can’t possibly match.

So, even if you can’t afford a large pumpkin from the patch, your family should still make a visit, maybe pick up some Indian Corn or smaller pumpkins, and take advantage of everything that is offered.  It will be a memory your family will never forget.

BAKED PUMPKIN SEEDS

Now that you have found the perfect pumpkin and are already to carve it, you probably are wondering what to do with all of those insides!  We have the perfect solution — for the seeds at least!

Here is our recipe for delicious baked pumpkin seeds…

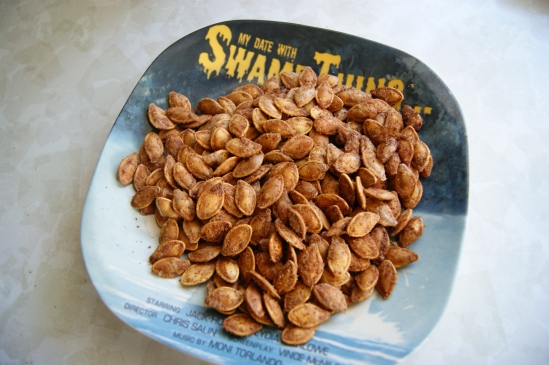
1.  Immediately after carving your pumpkin, remove the seeds and rinse them thoroughly.  After they have been cleaned, pad them dry and let them sit for several hours in a warm place.

2. Preheat oven to 300 F.  Once the pumpkin seeds are completely dry, place them in a mixing bowl and add 1 tablespoon melted butter for every one cup of seeds.  Mix the seeds so that they are completely coated.

3.  Sprinkle in garlic powder and salt, enough to taste.  Mix until every seed has a light covering.

4.  Pour the seeds onto a foil-lined baking sheet.  Spread the seeds so that they form a single layer.  It is important not to have them overlapping.

5.  Place the seeds in the oven and let bake 50 minutes, mixing them every 15 minutes or so.

6.  Add additional seasoning as desired and enjoy!

CREEPY CRAFTS

BOX OF BOOS

FRIGHTENING FOAM

If you have ever wandered into an arts and crafts store in the fall, you have undoubtedly seen a variety of pre-packaged art projects that can be used to dreary up any bright October day.

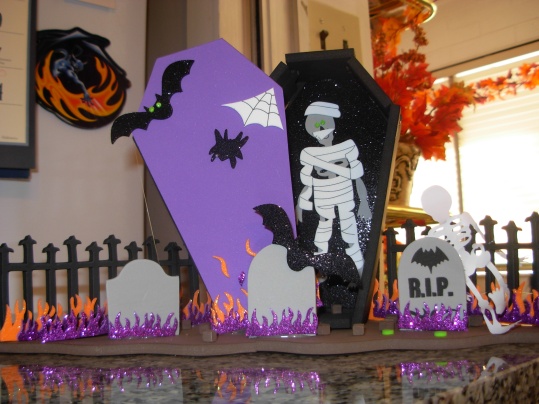
Kid-friendly foam kits, which let you and your family create haunted scenes out of small pieces of pre-cut foam, are just one example.  The variety of these kits has really expanded in recent years, and now you can create all kinds of things: graveyards, haunted houses, masks, monster boxes, cars, and more!

A lot of these kits don’t actually require much skill.  Some come with foam stickers, meaning you don’t even have to glue anything!  That is why they are good for the younger set as well as the older crowd.  But each kit is different, so be sure to read the box for details before considering a purchase.

One of the nice things about these kits is that they allow for a lot of customization and personalization.  You have the freedom and ability to place characters and other scene-setters in a variety of places on the foam bases, while still maintaining the same structure suggested by the manufacturer.  You can even add your own foam pieces or mix pieces among a number of kits.

These kits get the whole family involved in the building process and make great decorations when finished.  And there are a variety of ways you can incorporate the kits into your Halloween festivities.  You can buy one to assemble with the kids on a stormy evening, you can buy a number and have a family foam-building contest, or you can have a variety available at a kids’ Halloween party, set up tables, and have the party-goers bring their own creations to life.

CREEPY COOKIES

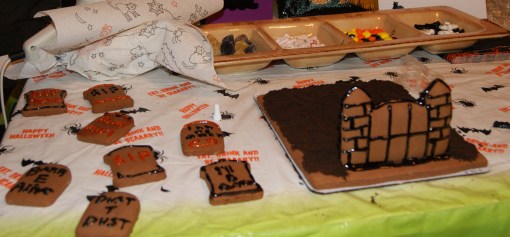
Another great option is the Cookie Decorating Kit.  We all know the classic Gingerbread House kits that come out at Christmas.  In recent years, many manufacturers have introduced Halloween-themed kits.  Take for example, the Cookie Graveyard kit from Target.  It is easier to assemble than a house, but just as fun.  The kit contains a cookie base, cookie tombstones, icing, as well as bat, bone, and ghost decorations, in addition to other candies that can be used to help decorate the edible display.  If you can’t track down this particular kit, check for alternate versions at other retailers.  There are a ton to choose from!

CHOCOLATE CHILLS

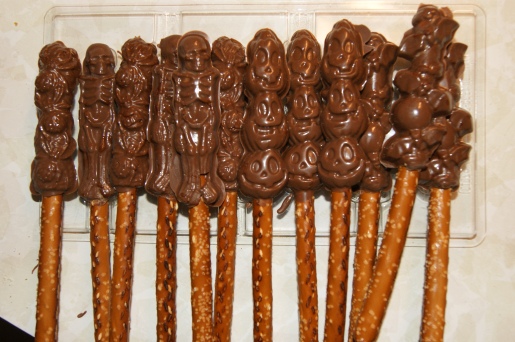
While you may already have enough chocolate in your house during the Halloween season, you may still be tempted to get some more, especially when you can create your own candy concoctions!  Companies like Wilton produce a lot of chocolate molds and kits that function as great activities for the whole family. Spooky Chocolate Dipped Pretzels are just one example.

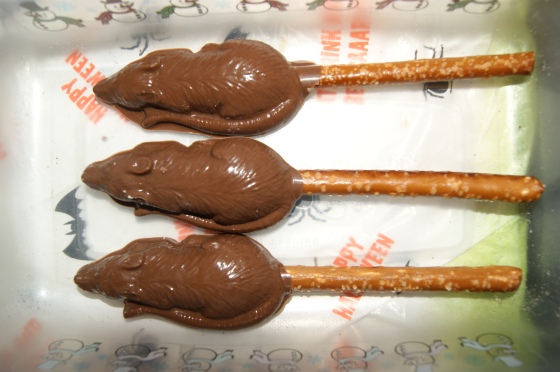
The kit includes everything you need to decorate your pretzel rods:  6 fun-shaped mold designs (4 Rat molds, 3 pumpkins, 3 bats, 3 spiders, and 3 skeleton molds), 16 oz. Wilton Candy Melts brand confectionery coating, 4 disposable decorating bags, 1 decorating brush, 20 pretzel bags with ties.  The only thing you will need to supply is the bag of jumbo pretzel rods.  (You may also want to buy some additional chocolate.)

All you need to do is stick the chocolate in a bag, put it in the microwave, squish the bag with your hands, and then pour into the molds.  Stick them in the fridge for about 30 minutes.  And voila; you have some awesome Halloween treats for all those special little boys and ghouls in your life!  What a terrific idea for parties!  And these would make great gifts for the office staff on Halloween day!

The best molds are definitely the rats.  These things are huge – and you get 4 rat molds, so you can make a whole family at one time.  The second best molds are the skeletons, followed the pumpkins.  The bats and spiders are fun, but my final versions didn’t turn out as great as the previously mentioned molds – though they are still pretty nifty.  Regardless, this kit is well worth the affordable price.  It makes for a great weekend activity to do with the kids or with yourself.  Plus, how can you beat the spooky, edible payoff?  The product is available to purchase at various locations: craft stores and other retailers.  And if you aren’t a fan of homemade chocolate creatures, there are plenty of other food craft kits out there – like the JELL-O Jigglers and the Rice Krispy Treat Pumpkins.

OTHER CRAFTY CREEPS

But not all craft projects come out of boxes, and Eek always wants to foster as much creativity as possible, so he suggests you head out to your local retailer to find materials for your next project.  Some craft shops sell Paper Mache.  Recently, Michael’s offered up miniature Paper Mache skulls.  Eek had a lot of fun with these and wanted to share some paint-scheme ideas to get you started:
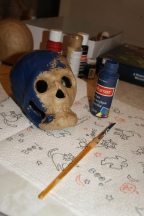
1.  Paint the skulls the colors of your favorite sports teams.  Even consider painting a logo on the top!

2.  Paint your skull with a base color and then add “metalic” coloring for a shiny look.

3.  Give your skulls a classic Halloween treatment by painting them orange and black.

4.  Give your skulls a tie-dye look.

5.  Use stencils to add images to the top and back of the skulls.

Once you’re done, consider adding them to your current Halloween decor.  Or how about using them as table toppers or as party favors?  The possibilities are endless.

We will be adding to this page as we think of more activities, so why not subscribe to The Big Scare for the latest undead updates?
2013 Family Activities Guide for October and Halloween

0

eek's ideasOur friend, Eek the Owl, has shared with us some frighteningly fun ideas to make the Halloween season even more enjoyable.   He has the whole family covered: chefs, crafters, adventurers, and board game aficionados!  There’s something for everyone in our Halloween Family Activities Guide!  Feel free to take a gander and try out some of these activities with your family this Halloween season!  And be sure to subscribe to The Big Scare for even more ideas!

Any opinions expressed in the following article do not constitute an endorsement of any product or retailer.   The following is for information purposes only.  Any instructions are for information purposes only.  The Big Scare cannot guarantee you will experience the same results as we did should you opt to use these instructions.  Feel free to share ways to improve the instructions in the comments section below.  All activities should be conducted under adult supervision.

BEWITCHING BAKING

Our first wise idea involves everyone’s favorite holiday activity — baking.  And, as Eek points out, it’s not just for wintertime.  Halloween provides the opportunity to create all kind of creepy concoctions.  From cut-out cookies to brownies, they all make perfect October baking projects.

HALLOWEEN BROWNIES

While brownies are devilishly delicious by themselves, there’s just something even more appealing about a Halloween Brownie.  Making Halloween Brownies is just as easy as baking regular brownies.  You do exactly what your favorite recipe (or box) tells you to do, but you change up a few things before putting the batter in to bake.  Rather than just pouring the batter into a pan, you want to line the pan with greased aluminum foil.  Basically what you want to do is rip out a piece of baking foil and place it in your baking pan, pushing it up against the sides, making sure the whole thing (meaning the entire bottom and all the sides) is well covered.  Press the tin foil against the sides of the glass or metal pan so that it hugs it and assumes the pan’s shape.  Ensure that there is enough room left to lift the foil up out of the pan when the brownies have baked.  Then proceed to grease (and flour) it as you normally would or as you are instructed to in the baking directions, so as to prevent the brownies from sticking.  Bake the batter as directed.  Remove from the oven and let set until cool.

Rather than cut the brownies in the pan, you are going to remove the entire brownie cake, hence the foil.  Once cooled,  you can remove the brownie cake by lifting the sides of the aluminum foil or turning the pan upside down, a method preferable in cases of wide pans.  Place the brownies on a clean surface covered in powdered sugar and remove the foil lining.  Your brownie cake should have maintained its shape.  (If at anytime it appears that your brownie cake may be breaking, consider cutting the brownie cake in the pan and removing it in smaller portions.)

Now comes the fun part.  Take some open  Halloween cookie cutters (meaning ones that are just outlines that do not have tops which would prevent the cutter from cutting through thick brownies) and cover them in powdered sugar.  (Make sure your cookie cutters are deep enough to cut through the thick brownie cake.  You can buy these cookie cutters at a number of major retailers.  They usually come in “tubs.”)  Press each cookie cutter all the way through the brownie cake, just as you would with cookie cutters in cookie dough.  Carefully remove your brownie shape and place it aside.  Continue to press cutters into the remaining brownie cake until the area of usable brownie cake has been cut.  Take the cutout shapes and decorate them with frosting, powdered sugar and candies.  Use the “scrap” brownies, the unused edges that are leftover, to add layering and detail to your treats — or just eat them!

GRISLY GAME NIGHT

In a world seemingly run by electronic entertainment, it’s sometimes hard to remember that other forms of fun exist., like board games!  And when those board games have a Halloween theme, their fun level quadruples.

There are a number of Halloween-themed board games available on the market, and plenty more that can be purchased secondhand.  One of the easiest games to track down is Halloween Boo-Opoly.  Much like the game from which it derives its objective, Boo-Opoly allows players to buy properties, many of which will be familiar (like Elm Street) and many of which will be new (Gourd Walk).  The old railroads are now different creatures of the night, and the utilities consist of Jack-O’-Lanterns and Witch’s Brew.  Instead of houses and hotels, players may buy Haunted Houses and Full Moons.  The gameplay is quite similar to Monopoly, but there are some slight differences.  Overall, it’s a fun game with a nice design.  The only thing that would make it better would be if the playing pieces weren’t just plain plastic pawns, and instead were shaped in the forms of Halloween characters.

And if Boo-Opoly isn’t quite your game, there are plenty of other options.  From vampire games to zombie games, a trip to the local toy store is certain to reap a nice harvest of spooky entertainment — especially at Halloween.

FROM TRIP TO TREAT

WHAT’S IN A PATCH?

Most families pick up pumpkins from their local grocer (or the super-center which has invaded their neighborhood).  And while it is great to have access to affordably-priced pumpkins, there is just something missing from the experience.

So, while you may opt to get your larger carving-friendly produce from the grocery store, a trip to the local (or not-so-local) pumpkin patch should be in order for your family this year, even if you don’t make your big pumpkin purchase there.  Not only do many patches provide fresh, right-off-the-vine pumpkins, they also provide a ton of activities for your family.  The experience that pumpkin patches provide is unprecedented.  Many of them have games, hayrides, corn mazes, and photo opportunities that the grocery store can’t possibly match.

So, even if you can’t afford a large pumpkin from the patch, your family should still make a visit, maybe pick up some Indian Corn or smaller pumpkins, and take advantage of everything that is offered.  It will be a memory your family will never forget.

BAKED PUMPKIN SEEDS

Now that you have found the perfect pumpkin and are already to carve it, you probably are wondering what to do with all of those insides!  We have the perfect solution — for the seeds at least!

Here is our recipe for delicious baked pumpkin seeds…

1.  Immediately after carving your pumpkin, remove the seeds and rinse them thoroughly.  After they have been cleaned, pad them dry and let them sit for several hours in a warm place.

2. Preheat oven to 300 F.  Once the pumpkin seeds are completely dry, place them in a mixing bowl and add 1 tablespoon melted butter for every one cup of seeds.  Mix the seeds so that they are completely coated.

3.  Sprinkle in garlic powder and salt, enough to taste.  Mix until every seed has a light covering.

4.  Pour the seeds onto a foil-lined baking sheet.  Spread the seeds so that they form a single layer.  It is important not to have them overlapping.

5.  Place the seeds in the oven and let bake 50 minutes, mixing them every 15 minutes or so.

6.  Add additional seasoning as desired and enjoy!

CREEPY CRAFTS

BOX OF BOOS

FRIGHTENING FOAM

If you have ever wandered into an arts and crafts store in the fall, you have undoubtedly seen a variety of pre-packaged art projects that can be used to dreary up any bright October day.

Kid-friendly foam kits, which let you and your family create haunted scenes out of small pieces of pre-cut foam, are just one example.  The variety of these kits has really expanded in recent years, and now you can create all kinds of things: graveyards, haunted houses, masks, monster boxes, cars, and more!

A lot of these kits don’t actually require much skill.  Some come with foam stickers, meaning you don’t even have to glue anything!  That is why they are good for the younger set as well as the older crowd.  But each kit is different, so be sure to read the box for details before considering a purchase.

One of the nice things about these kits is that they allow for a lot of customization and personalization.  You have the freedom and ability to place characters and other scene-setters in a variety of places on the foam bases, while still maintaining the same structure suggested by the manufacturer.  You can even add your own foam pieces or mix pieces among a number of kits.

These kits get the whole family involved in the building process and make great decorations when finished.  And there are a variety of ways you can incorporate the kits into your Halloween festivities.  You can buy one to assemble with the kids on a stormy evening, you can buy a number and have a family foam-building contest, or you can have a variety available at a kids’ Halloween party, set up tables, and have the party-goers bring their own creations to life.

CREEPY COOKIES

Another great option is the Cookie Decorating Kit.  We all know the classic Gingerbread House kits that come out at Christmas.  In recent years, many manufacturers have introduced Halloween-themed kits.  Take for example, the Cookie Graveyard kit from Target.  It is easier to assemble than a house, but just as fun.  The kit contains a cookie base, cookie tombstones, icing, as well as bat, bone, and ghost decorations, in addition to other candies that can be used to help decorate the edible display.  If you can’t track down this particular kit, check for alternate versions at other retailers.  There are a ton to choose from!

CHOCOLATE CHILLS

While you may already have enough chocolate in your house during the Halloween season, you may still be tempted to get some more, especially when you can create your own candy concoctions!  Companies like Wilton produce a lot of chocolate molds and kits that function as great activities for the whole family. Spooky Chocolate Dipped Pretzels are just one example.

The kit includes everything you need to decorate your pretzel rods:  6 fun-shaped mold designs (4 Rat molds, 3 pumpkins, 3 bats, 3 spiders, and 3 skeleton molds), 16 oz. Wilton Candy Melts brand confectionery coating, 4 disposable decorating bags, 1 decorating brush, 20 pretzel bags with ties.  The only thing you will need to supply is the bag of jumbo pretzel rods.  (You may also want to buy some additional chocolate.)

All you need to do is stick the chocolate in a bag, put it in the microwave, squish the bag with your hands, and then pour into the molds.  Stick them in the fridge for about 30 minutes.  And voila; you have some awesome Halloween treats for all those special little boys and ghouls in your life!  What a terrific idea for parties!  And these would make great gifts for the office staff on Halloween day!

The best molds are definitely the rats.  These things are huge – and you get 4 rat molds, so you can make a whole family at one time.  The second best molds are the skeletons, followed the pumpkins.  The bats and spiders are fun, but my final versions didn’t turn out as great as the previously mentioned molds – though they are still pretty nifty.  Regardless, this kit is well worth the affordable price.  It makes for a great weekend activity to do with the kids or with yourself.  Plus, how can you beat the spooky, edible payoff?  The product is available to purchase at various locations: craft stores and other retailers.  And if you aren’t a fan of homemade chocolate creatures, there are plenty of other food craft kits out there – like the JELL-O Jigglers and the Rice Krispy Treat Pumpkins.

OTHER CRAFTY CREEPS

But not all craft projects come out of boxes, and Eek always wants to foster as much creativity as possible, so he suggests you head out to your local retailer to find materials for your next project.  Some craft shops sell Paper Mache.  Recently, Michael’s offered up miniature Paper Mache skulls.  Eek had a lot of fun with these and wanted to share some paint-scheme ideas to get you started:

1.  Paint the skulls the colors of your favorite sports teams.  Even consider painting a logo on the top!

2.  Paint your skull with a base color and then add “metalic” coloring for a shiny look.

3.  Give your skulls a classic Halloween treatment by painting them orange and black.

4.  Give your skulls a tie-dye look.

5.  Use stencils to add images to the top and back of the skulls.

Once you’re done, consider adding them to your current Halloween decor.  Or how about using them as table toppers or as party favors?  The possibilities are endless.

We will be adding to this page as we think of more activities, so why not subscribe to The Big Scare for the latest undead updates?

Halloween Activities Revisited | Rice Krispies Treats: Halloween Pumpkin Kit

3
The following does not constitute an endorsement of any product or retailer.   It is for information purposes only.

In our follow-up to our Halloween Activities Week, we’re bringing you another wise idea from our friend, Eek the Owl.  If you haven’t already viewed our previous family Halloween activity suggestions, you can do so by clicking here.

Today’s wise idea involves Rice Krispies Treats.  While they can be purchased pre-made in the store of your choice or made from scratch, an alternative is the official Rice Krispies Treat Kit.  This year, Snap, Crackle and Pop have concocted a pumpkin-themed kit to entice Halloween-lovers.  So we purchased it and tried it out.

The kit includes two “3D” pumpkin molds (both in the same container), Rice Krispies cereal, mini marshmallows, 2 icing pens and orange food coloring gel. It says it makes 14 pumpkin treats.  As usual, the yield was actually less…

The kit itself seemed easy enough.  And, for the most part, it was.  The challenge came with the whole bit about melting the marshmallows.  As simple as that process may sound, it’s really not — especially if one is not a seasoned expert.  One would think these things would just sort of melt.  They don’t.  To describe the experience would prove futile.  Just be warned, non-marshmallow-melters, this is not an easy undertaking.

Fortunately, things became less complicated after the “melting” was over.  While the Rice Krispies weren’t exactly thrilled about being glued together with our marshmallow paste, they eventually gave in.  Molding the Krispies Treats is a lot easier than I thought it would be.  In fact, we had all 8 – not 14 – done in a few minutes.  The experience proved to be more work than I bargained for, but the reward followed when it came time to decorate the pumpkins.  That was unparalleled fun.

When it comes down to it, there are probably simpler methods of putting funny faces on desserts, but we were glad to have done it this way — at least once.

Halloween Activities Week: Monster Movie Marathons

2

One of the best ways to spend a chilly October evening is watching Monster Movies.  If you have a home video collection filled with the Macabre or access to Netflix or a similar video-streaming service, this is relatively easy to do.  You can either plan out a schedule of films to watch or select them in a spontaneous manner.  After all, who hasn’t said, “It feels like a Creature from the Black Lagoon kind of night?”

Now, if you don’t have access to the Diabolic on demand, there are a number of alternatives.  Throughout the month of October, movie channels will be featuring a variety of fright flicks.  You can catch Pet Sematary and Halloween IV on AMC in the days leading up to Halloween.  Or you can spend your entire Halloween day plastered to the living room couch, watching  Horror Classics on Turner Classic Movies.

Beginning October 11, AMC will feature a variety of films that are sure to cause a fright.  From Cujo to Friday the 13th, there are a slew of Horror flicks worth watching.  Check out the schedule here.

And then, every Wednesday in October, Turner Classic Movies is featuring our favorite Monster Movies.

Here are some highlights:

PLEASE NOTE:  THESE ARE HIGHLIGHTS.  THERE ARE PLENTY OF OTHER MONSTER MOVIES SHOWING ON TURNER THROUGHOUT OCTOBER.  ALL TIMES LISTED HERE ARE FOR VIEWERS IN THE PACIFIC TIME ZONE. ALL TIMES ARE SUBJECT TO CHANGE.  CONSULT THE TURNER CLASSIC MOVIES SCHEDULE FOR THE MOST UP-TO-DATE INFORMATION. 

October 10

5:00 PM PST – The Haunting (1963)

7:00 PM PST –  The Uninvited (1944)

9:00 PM PST – The House On Haunted Hill (1959)

October 17

5:00 PM PST – Horror of Dracula (1958)

6:30 PM  PST- Curse of Frankenstein (1957)

8:00 PM PST – The Mummy (1959)

October 24

5:00 PM  PST – The Raven (1963)

6:45 PM PST – Murders In the Rue Morgue  (1932)

8:00 PM PST – The Black Cat (1934)

October 31

3:30 AM PST- London After Midnight (Restoration) (1927)

4:30 AM PST- The Ghoul (1933)

6:00 AM PST – House of Dark Shadows (1970)

11:30 AM PST – Last Man On Earth (1964)

1:00 PM – Devil Bat  (1940)

2:15 PM PST – White Zombie  (1932)

3:30 PM PST- The Body Snatcher (1945)

5:00 PM PST – Frankenstein (1931)

6:30 PM PST – Son of Frankenstein (1939)

8:15 PM PST – The Wolf Man (1941)

9:30 PM PST – The Mummy (1932)

11:00 PM PST – The Mummy’s Hand (1940)

November 1

12:15 AM PST – Island of Lost Souls – (1933)

1:30 AM PST- The Invisible Man (1933)

Halloween Activities Week: JELLO Halloween Mold Kit

5
The following does not constitute an endorsement of any product or retailer.   It is for information purposes only.

For years, Jello Jigglers have been a holiday treat enjoyed by young and old.  This year, however, Jello has released a ready-made family fun kit to help with the Jiggler-making process.

The Jello Jigglers Mold Kit is available at a variety of retailers, from supermarkets to Walmart.  It comes with almost everything you need to create your own Jack-O’-Lantern, Bat, and Ghost Jigglers.  Included is an orange rubber-like mold tray that yields six shapes, one 6 oz. package of grape gelatin dessert mix, and one 6 oz. package of orange gelatin dessert mix.  Cutout instructions are provided on the back of the box.

What are some other Halloween food kits you have seen this year?  Share your finds in the comments section below!

Spook Spotter: Dollar Finds: Halloween Treat Bags

0
The following does not constitute an endorsement of any product or retailer.   It is for information purposes only.

A stop at a dollar store like The Dollar Tree can bring with it a lot of surprises, especially at this time of year.  From foam tombstones to bags of fingers, the Dollar Tree has some interesting fare that can be used to haunt your home.  Among other goodies, this year, they are carrying an assortment of Halloween sandwich bags.  These bags are usually produced by the big names in the ”baggie” industry and can be hard to track down at the big box stores, which is why it was surprising to find these alternatives at the Dollar Tree.  This year, the discounter is offering a box of 25 Halloween Sandwich Bags for a dollar.  There are two designs: a Halloween Collage and a Jack-O’-Lantern print.  If you can’t find these or would rather wait for the name-brand releases, they can generally be tracked down near the end of September in places like Target.

These baggies are great for daily use, for your kids’ lunch — or your own!  However, they also would work wonderfully for the Halloween night Treaters.  You can fill them with miniature candies, little toys or both!  The zip-up feature makes it so you don’t have to worry about treats falling out and the designs add that extra bit of flare that makes your treat memorable.  The opportunities for using these baggies are endless.  Share some of your ideas in the comments section below!

Check back here tomorrow for more great tips, tricks, and treats to get your prepared for the big night!

Spook Spotter: Who’s In? Owl is In!

0
The following does not constitute an endorsement of any product or retailer.   It is for information purposes only.

This glittery owl figure was picked up at Michael’s.

In recent years, you may have noticed a significant increase in the amount of our feathered friends on store shelves.  Places like JoAnn Fabrics and Michael’s Arts and Crafts are continuing the trend this year, with a specific emphasis on the most inquisitive bird of all — owls.

Yes, a visit to almost any retailer this Halloween season will surely bring with it some owl sightings.  They come in all shapes and sizes and in a variety of different formats.  From beautiful to spooky, these night fliers are big!

Now you may be wondering why owls have long been associated with Halloween.  Owls have a long-running history with the sinister side of nature, especially in ancient folklore.  The Romans and the English both held beliefs that owls were in league with dark forces.  Owls were night hunters and that surely meant that they were creatures of the Underworld.  Their silent soaring, their loud screeching… all things to be feared in the cultures of old.  The associations have carried through to the modern day.  And while we now think of owls in more pleasant situations, they still maintain a strong association with night — and, as such, they are symbolic of Halloween.

So this year, you may want to pick up an owl to add a bit of wisdom to your Haunted Home.

Spook Spotter: Martha Stewart Halloween Bargains

0

The following does not constitute an endorsement of any product or retailer.   It is for information purposes only.

Some Marshall’s stores have received shipments of Martha Stewart Halloween decorations and craft supplies.  And they are selling them at discounted rates, something usually unheard of when it comes to the Martha Stewart line.  Our local Marshall’s store has everything from window clings to Halloween scrapbooking supplies.  The selection, if available, at your store will probably vary.

We managed to pick up an “Elegant Witch Scene Setter” for just $2.99.  Unlike the more common — and more expensive — scene setters at party stores that are made of a vinyl-like material, this one is made of a light fabric, so it appears to be more durable.  But, the name is also a little misleading, as it is less like a ”scene setter” and more like a traditional wall or door hanging.  You may want to check out a Marshall’s store to see if they have anything you can use to haunt your home… or your Halloween craft projects!   If you should go, let us know what you dig up by posting in the comments section below!

Check back next week for our final weekly post before our daily countdown begins, September 3!

2013 Family Activities Guide for October and Halloween

1

eek's ideasOur friend, Eek the Owl, has shared with us some frighteningly fun ideas to make the Halloween season even more enjoyable.   He has the whole family covered: chefs, crafters, adventurers, and board game aficionados!  There’s something for everyone in our Halloween Family Activities Guide!  Feel free to take a gander and try out some of these activities with your family this Halloween season!  And be sure to subscribe to The Big Scare for even more ideas!

Any opinions expressed in the following article do not constitute an endorsement of any product or retailer.   The following is for information purposes only.  Any instructions are for information purposes only.  The Big Scare cannot guarantee you will experience the same results as we did should you opt to use these instructions.  Feel free to share ways to improve the instructions in the comments section below.  All activities should be conducted under adult supervision.

BEWITCHING BAKING

Our first wise idea involves everyone’s favorite holiday activity — baking.  And, as Eek points out, it’s not just for wintertime.  Halloween provides the opportunity to create all kind of creepy concoctions.  From cut-out cookies to brownies, they all make perfect October baking projects.

HALLOWEEN BROWNIES

While brownies are devilishly delicious by themselves, there’s just something even more appealing about a Halloween Brownie.  Making Halloween Brownies is just as easy as baking regular brownies.  You do exactly what your favorite recipe (or box) tells you to do, but you change up a few things before putting the batter in to bake.  Rather than just pouring the batter into a pan, you want to line the pan with greased aluminum foil.  Basically what you want to do is rip out a piece of baking foil and place it in your baking pan, pushing it up against the sides, making sure the whole thing (meaning the entire bottom and all the sides) is well covered.  Press the tin foil against the sides of the glass or metal pan so that it hugs it and assumes the pan’s shape.  Ensure that there is enough room left to lift the foil up out of the pan when the brownies have baked.  Then proceed to grease (and flour) it as you normally would or as you are instructed to in the baking directions, so as to prevent the brownies from sticking.  Bake the batter as directed.  Remove from the oven and let set until cool.

Rather than cut the brownies in the pan, you are going to remove the entire brownie cake, hence the foil.  Once cooled,  you can remove the brownie cake by lifting the sides of the aluminum foil or turning the pan upside down, a method preferable in cases of wide pans.  Place the brownies on a clean surface covered in powdered sugar and remove the foil lining.  Your brownie cake should have maintained its shape.  (If at anytime it appears that your brownie cake may be breaking, consider cutting the brownie cake in the pan and removing it in smaller portions.)

Now comes the fun part.  Take some open  Halloween cookie cutters (meaning ones that are just outlines that do not have tops which would prevent the cutter from cutting through thick brownies) and cover them in powdered sugar.  (Make sure your cookie cutters are deep enough to cut through the thick brownie cake.  You can buy these cookie cutters at a number of major retailers.  They usually come in “tubs.”)  Press each cookie cutter all the way through the brownie cake, just as you would with cookie cutters in cookie dough.  Carefully remove your brownie shape and place it aside.  Continue to press cutters into the remaining brownie cake until the area of usable brownie cake has been cut.  Take the cutout shapes and decorate them with frosting, powdered sugar and candies.  Use the “scrap” brownies, the unused edges that are leftover, to add layering and detail to your treats — or just eat them!

GRISLY GAME NIGHT

In a world seemingly run by electronic entertainment, it’s sometimes hard to remember that other forms of fun exist., like board games!  And when those board games have a Halloween theme, their fun level quadruples.

There are a number of Halloween-themed board games available on the market, and plenty more that can be purchased secondhand.  One of the easiest games to track down is Halloween Boo-Opoly.  Much like the game from which it derives its objective, Boo-Opoly allows players to buy properties, many of which will be familiar (like Elm Street) and many of which will be new (Gourd Walk).  The old railroads are now different creatures of the night, and the utilities consist of Jack-O’-Lanterns and Witch’s Brew.  Instead of houses and hotels, players may buy Haunted Houses and Full Moons.  The gameplay is quite similar to Monopoly, but there are some slight differences.  Overall, it’s a fun game with a nice design.  The only thing that would make it better would be if the playing pieces weren’t just plain plastic pawns, and instead were shaped in the forms of Halloween characters.

And if Boo-Opoly isn’t quite your game, there are plenty of other options.  From vampire games to zombie games, a trip to the local toy store is certain to reap a nice harvest of spooky entertainment — especially at Halloween.

FROM TRIP TO TREAT

WHAT’S IN A PATCH?

Most families pick up pumpkins from their local grocer (or the super-center which has invaded their neighborhood).  And while it is great to have access to affordably-priced pumpkins, there is just something missing from the experience.

So, while you may opt to get your larger carving-friendly produce from the grocery store, a trip to the local (or not-so-local) pumpkin patch should be in order for your family this year, even if you don’t make your big pumpkin purchase there.  Not only do many patches provide fresh, right-off-the-vine pumpkins, they also provide a ton of activities for your family.  The experience that pumpkin patches provide is unprecedented.  Many of them have games, hayrides, corn mazes, and photo opportunities that the grocery store can’t possibly match.

So, even if you can’t afford a large pumpkin from the patch, your family should still make a visit, maybe pick up some Indian Corn or smaller pumpkins, and take advantage of everything that is offered.  It will be a memory your family will never forget.

BAKED PUMPKIN SEEDS

Now that you have found the perfect pumpkin and are already to carve it, you probably are wondering what to do with all of those insides!  We have the perfect solution — for the seeds at least!

Here is our recipe for delicious baked pumpkin seeds…

1.  Immediately after carving your pumpkin, remove the seeds and rinse them thoroughly.  After they have been cleaned, pad them dry and let them sit for several hours in a warm place.

2. Preheat oven to 300 F.  Once the pumpkin seeds are completely dry, place them in a mixing bowl and add 1 tablespoon melted butter for every one cup of seeds.  Mix the seeds so that they are completely coated.

3.  Sprinkle in garlic powder and salt, enough to taste.  Mix until every seed has a light covering.

4.  Pour the seeds onto a foil-lined baking sheet.  Spread the seeds so that they form a single layer.  It is important not to have them overlapping.

5.  Place the seeds in the oven and let bake 50 minutes, mixing them every 15 minutes or so.

6.  Add additional seasoning as desired and enjoy!

CREEPY CRAFTS

BOX OF BOOS

FRIGHTENING FOAM

If you have ever wandered into an arts and crafts store in the fall, you have undoubtedly seen a variety of pre-packaged art projects that can be used to dreary up any bright October day.

Kid-friendly foam kits, which let you and your family create haunted scenes out of small pieces of pre-cut foam, are just one example.  The variety of these kits has really expanded in recent years, and now you can create all kinds of things: graveyards, haunted houses, masks, monster boxes, cars, and more!

A lot of these kits don’t actually require much skill.  Some come with foam stickers, meaning you don’t even have to glue anything!  That is why they are good for the younger set as well as the older crowd.  But each kit is different, so be sure to read the box for details before considering a purchase.

One of the nice things about these kits is that they allow for a lot of customization and personalization.  You have the freedom and ability to place characters and other scene-setters in a variety of places on the foam bases, while still maintaining the same structure suggested by the manufacturer.  You can even add your own foam pieces or mix pieces among a number of kits.

These kits get the whole family involved in the building process and make great decorations when finished.  And there are a variety of ways you can incorporate the kits into your Halloween festivities.  You can buy one to assemble with the kids on a stormy evening, you can buy a number and have a family foam-building contest, or you can have a variety available at a kids’ Halloween party, set up tables, and have the party-goers bring their own creations to life.

CREEPY COOKIES

Another great option is the Cookie Decorating Kit.  We all know the classic Gingerbread House kits that come out at Christmas.  In recent years, many manufacturers have introduced Halloween-themed kits.  Take for example, the Cookie Graveyard kit from Target.  It is easier to assemble than a house, but just as fun.  The kit contains a cookie base, cookie tombstones, icing, as well as bat, bone, and ghost decorations, in addition to other candies that can be used to help decorate the edible display.  If you can’t track down this particular kit, check for alternate versions at other retailers.  There are a ton to choose from!

CHOCOLATE CHILLS

While you may already have enough chocolate in your house during the Halloween season, you may still be tempted to get some more, especially when you can create your own candy concoctions!  Companies like Wilton produce a lot of chocolate molds and kits that function as great activities for the whole family. Spooky Chocolate Dipped Pretzels are just one example.

The kit includes everything you need to decorate your pretzel rods:  6 fun-shaped mold designs (4 Rat molds, 3 pumpkins, 3 bats, 3 spiders, and 3 skeleton molds), 16 oz. Wilton Candy Melts brand confectionery coating, 4 disposable decorating bags, 1 decorating brush, 20 pretzel bags with ties.  The only thing you will need to supply is the bag of jumbo pretzel rods.  (You may also want to buy some additional chocolate.)

All you need to do is stick the chocolate in a bag, put it in the microwave, squish the bag with your hands, and then pour into the molds.  Stick them in the fridge for about 30 minutes.  And voila; you have some awesome Halloween treats for all those special little boys and ghouls in your life!  What a terrific idea for parties!  And these would make great gifts for the office staff on Halloween day!

The best molds are definitely the rats.  These things are huge – and you get 4 rat molds, so you can make a whole family at one time.  The second best molds are the skeletons, followed the pumpkins.  The bats and spiders are fun, but my final versions didn’t turn out as great as the previously mentioned molds – though they are still pretty nifty.  Regardless, this kit is well worth the affordable price.  It makes for a great weekend activity to do with the kids or with yourself.  Plus, how can you beat the spooky, edible payoff?  The product is available to purchase at various locations: craft stores and other retailers.  And if you aren’t a fan of homemade chocolate creatures, there are plenty of other food craft kits out there – like the JELL-O Jigglers and the Rice Krispy Treat Pumpkins.

OTHER CRAFTY CREEPS

But not all craft projects come out of boxes, and Eek always wants to foster as much creativity as possible, so he suggests you head out to your local retailer to find materials for your next project.  Some craft shops sell Paper Mache.  Recently, Michael’s offered up miniature Paper Mache skulls.  Eek had a lot of fun with these and wanted to share some paint-scheme ideas to get you started:

1.  Paint the skulls the colors of your favorite sports teams.  Even consider painting a logo on the top!

2.  Paint your skull with a base color and then add “metalic” coloring for a shiny look.

3.  Give your skulls a classic Halloween treatment by painting them orange and black.

4.  Give your skulls a tie-dye look.

5.  Use stencils to add images to the top and back of the skulls.

Once you’re done, consider adding them to your current Halloween decor.  Or how about using them as table toppers or as party favors?  The possibilities are endless.

We will be adding to this page as we think of more activities, so why not subscribe to The Big Scare for the latest undead updates?