Halloween Cardboard Die-Cut Gallery: Creatures of the Night

2

The Big Scare is proud to announce the final installment of this year’s Halloween Cardboard Die-Cut Gallery.  We hope you have enjoyed all of the frightening images you have seen here.  We will be back with even more images next year.  Until then, take in the terror-ific sights of these Halloween frights.  We’ll be back in two days with another post.


Spook Spotter: The Best Halloween Candy of 2015

0

Big Scare spook spotter

We hope you are enjoying our Countdown to Halloween.  As always, we’d love to hear your freaky feedback.  Please be certain to share your thoughts with us in the comments section.  We love hearing from our ghastly guests!

The following does not constitute an endorsement of any product or retailer.   It is for information purposes only.

When it comes to Halloween Treats, this is an exceptional year!  Not only is there a wide array of Halloween candy available this year, but many retailers are stocking up on candy assortments in special Halloween packaging.  Target has a variety of Halloween-themed bags, while Walmart has awfully awesome boxes in which it is displaying the candy.  Today, we’re featuring some of the best candy assortments of the season.

One of the best assortments is available at Target.  The Hershey’s Halloween shapes, four-candy assortment features Hershey’s Chocolate Tombstones, Hershey’s Cookies ‘n Creme Tombstones, Reese’s Pumpkins, and York Peppermint Pumpkins.  This classic combination will create a smile on even the most forlorn of fiends.

Hershey's Candy

Hershey’s Candy

Meanwhile, Hershey’s Miniatures, featuring Hershey’s Chocolate, Special Dark Chocolate, Mr. Goodbar, and Krackle, have had an autumnal facelift.  These classic candies, which have come in special fall wrappers for many years, now feature forest friends like squirrels and owls.  Nestle Crunch has partnered with the Peanuts.  The chocolate bars now showcase various Peanuts characters on the packaging and the chocolate itself.  “It’s the Great Pumpkin, Charlie Brown!” is the centerpiece of a larger, individually-packaged Crunch bar.  And Snickers has a spooky new fun-size bar: the X-Scream bar.  Palmer has a terrific Trick or Treat assortment, featuring Double-Crisp Witches, Fudge-Filled Skulls, and Peanut Butter Pumpkins.  You can see the detail in the gallery below.  Plus, Kit Kat is back with its Halloween-themed bars.  Check out all of these great chocolate concoctions and share your favorites below!


2015 Family Activities Guide for October and Halloween

1

eek's ideasOur friend, Eek the Owl, has shared with us some frighteningly fun ideas to make the Halloween season even more enjoyable.   He has the whole family covered: chefs, crafters, adventurers, and board game aficionados!  There’s something for everyone in our Halloween Family Activities Guide!  Feel free to take a gander and try out some of these activities with your family this Halloween season!  And be sure to subscribe to The Big Scare for even more ideas!

Any opinions expressed in the following article do not constitute an endorsement of any product or retailer.   The following is for information purposes only.  Any instructions are for information purposes only.  The Big Scare cannot guarantee you will experience the same results as we did should you opt to use these instructions.  Feel free to share ways to improve the instructions in the comments section below.  All activities should be conducted under adult supervision.

BEWITCHING BAKING

Our first wise idea involves everyone’s favorite holiday activity — baking.  And, as Eek points out, it’s not just for wintertime.  Halloween provides the opportunity to create all kind of creepy concoctions.  From cut-out cookies to brownies, they all make perfect October baking projects.

HALLOWEEN BROWNIES

While brownies are devilishly delicious by themselves, there’s just something even more appealing about a Halloween Brownie.  Making Halloween Brownies is just as easy as baking regular brownies.  You do exactly what your favorite recipe (or box) tells you to do, but you change up a few things before putting the batter in to bake.  Rather than just pouring the batter into a pan, you want to line the pan with greased aluminum foil.  Basically what you want to do is rip out a piece of baking foil and place it in your baking pan, pushing it up against the sides, making sure the whole thing (meaning the entire bottom and all the sides) is well covered.  Press the tin foil against the sides of the glass or metal pan so that it hugs it and assumes the pan’s shape.  Ensure that there is enough room left to lift the foil up out of the pan when the brownies have baked.  Then proceed to grease (and flour) it as you normally would or as you are instructed to in the baking directions, so as to prevent the brownies from sticking.  Bake the batter as directed.  Remove from the oven and let set until cool.

Rather than cut the brownies in the pan, you are going to remove the entire brownie cake, hence the foil.  Once cooled,  you can remove the brownie cake by lifting the sides of the aluminum foil or turning the pan upside down, a method preferable in cases of wide pans.  Place the brownies on a clean surface covered in powdered sugar and remove the foil lining.  Your brownie cake should have maintained its shape.  (If at anytime it appears that your brownie cake may be breaking, consider cutting the brownie cake in the pan and removing it in smaller portions.)

Now comes the fun part.  Take some open  Halloween cookie cutters (meaning ones that are just outlines that do not have tops which would prevent the cutter from cutting through thick brownies) and cover them in powdered sugar.  (Make sure your cookie cutters are deep enough to cut through the thick brownie cake.  You can buy these cookie cutters at a number of major retailers.  They usually come in “tubs.”)  Press each cookie cutter all the way through the brownie cake, just as you would with cookie cutters in cookie dough.  Carefully remove your brownie shape and place it aside.  Continue to press cutters into the remaining brownie cake until the area of usable brownie cake has been cut.  Take the cutout shapes and decorate them with frosting, powdered sugar and candies.  Use the “scrap” brownies, the unused edges that are leftover, to add layering and detail to your treats — or just eat them!

GRISLY GAME NIGHT

In a world seemingly run by electronic entertainment, it’s sometimes hard to remember that other forms of fun exist., like board games!  And when those board games have a Halloween theme, their fun level quadruples.
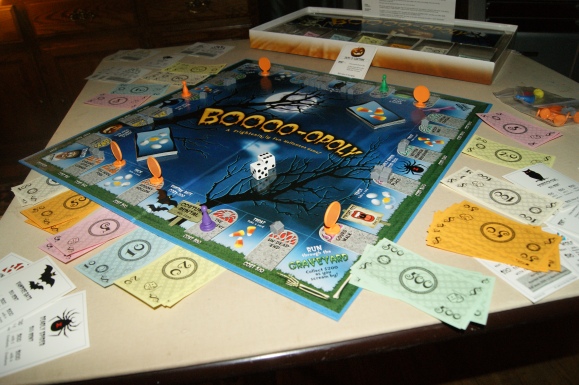
There are a number of Halloween-themed board games available on the market, and plenty more that can be purchased secondhand.  One of the easiest games to track down is Halloween Boo-Opoly.  Much like the game from which it derives its objective, Boo-Opoly allows players to buy properties, many of which will be familiar (like Elm Street) and many of which will be new (Gourd Walk).  The old railroads are now different creatures of the night, and the utilities consist of Jack-O’-Lanterns and Witch’s Brew.  Instead of houses and hotels, players may buy Haunted Houses and Full Moons.  The gameplay is quite similar to Monopoly, but there are some slight differences.  Overall, it’s a fun game with a nice design.  The only thing that would make it better would be if the playing pieces weren’t just plain plastic pawns, and instead were shaped in the forms of Halloween characters.

And if Boo-Opoly isn’t quite your game, there are plenty of other options.  From vampire games to zombie games, a trip to the local toy store is certain to reap a nice harvest of spooky entertainment — especially at Halloween.

FROM TRIP TO TREAT

WHAT’S IN A PATCH?

Most families pick up pumpkins from their local grocer (or the super-center which has invaded their neighborhood).  And while it is great to have access to affordably-priced pumpkins, there is just something missing from the experience.

So, while you may opt to get your larger carving-friendly produce from the grocery store, a trip to the local (or not-so-local) pumpkin patch should be in order for your family this year, even if you don’t make your big pumpkin purchase there.  Not only do many patches provide fresh, right-off-the-vine pumpkins, they also provide a ton of activities for your family.  The experience that pumpkin patches provide is unprecedented.  Many of them have games, hayrides, corn mazes, and photo opportunities that the grocery store can’t possibly match.

So, even if you can’t afford a large pumpkin from the patch, your family should still make a visit, maybe pick up some Indian Corn or smaller pumpkins, and take advantage of everything that is offered.  It will be a memory your family will never forget.

BAKED PUMPKIN SEEDS

Now that you have found the perfect pumpkin and are already to carve it, you probably are wondering what to do with all of those insides!  We have the perfect solution — for the seeds at least!

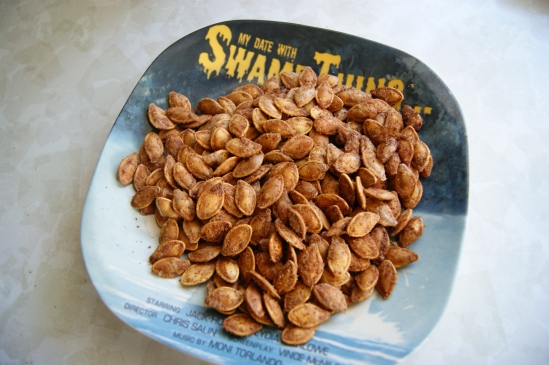
Here is our recipe for delicious baked pumpkin seeds…

1.  Immediately after carving your pumpkin, remove the seeds and rinse them thoroughly.  After they have been cleaned, pad them dry and let them sit for several hours in a warm place.

2. Preheat oven to 300 F.  Once the pumpkin seeds are completely dry, place them in a mixing bowl and add 1 tablespoon melted butter for every one cup of seeds.  Mix the seeds so that they are completely coated.

3.  Sprinkle in garlic powder and salt, enough to taste.  Mix until every seed has a light covering.

4.  Pour the seeds onto a foil-lined baking sheet.  Spread the seeds so that they form a single layer.  It is important not to have them overlapping.

5.  Place the seeds in the oven and let bake 50 minutes, mixing them every 15 minutes or so.

6.  Add additional seasoning as desired and enjoy!
CREEPY CRAFTS

BOX OF BOOS

FRIGHTENING FOAM

If you have ever wandered into an arts and crafts store in the fall, you have undoubtedly seen a variety of pre-packaged art projects that can be used to dreary up any bright October day.

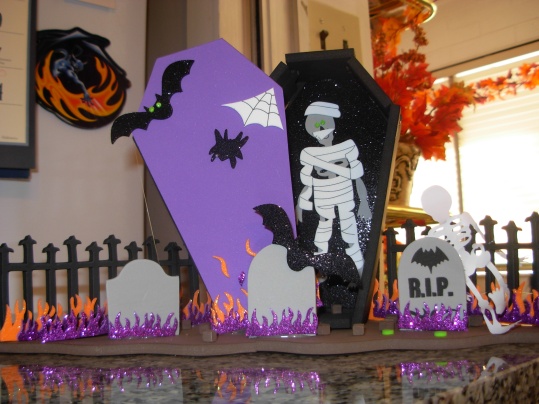
Kid-friendly foam kits, which let you and your family create haunted scenes out of small pieces of pre-cut foam, are just one example.  The variety of these kits has really expanded in recent years, and now you can create all kinds of things: graveyards, haunted houses, masks, monster boxes, cars, and more!

A lot of these kits don’t actually require much skill.  Some come with foam stickers, meaning you don’t even have to glue anything!  That is why they are good for the younger set as well as the older crowd.  But each kit is different, so be sure to read the box for details before considering a purchase.

One of the nice things about these kits is that they allow for a lot of customization and personalization.  You have the freedom and ability to place characters and other scene-setters in a variety of places on the foam bases, while still maintaining the same structure suggested by the manufacturer.  You can even add your own foam pieces or mix pieces among a number of kits.

These kits get the whole family involved in the building process and make great decorations when finished.  And there are a variety of ways you can incorporate the kits into your Halloween festivities.  You can buy one to assemble with the kids on a stormy evening, you can buy a number and have a family foam-building contest, or you can have a variety available at a kids’ Halloween party, set up tables, and have the party-goers bring their own creations to life.
CREEPY COOKIES

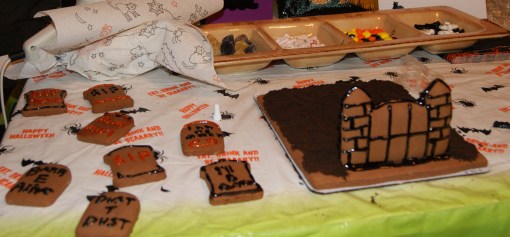
Another great option is the Cookie Decorating Kit.  We all know the classic Gingerbread House kits that come out at Christmas.  In recent years, many manufacturers have introduced Halloween-themed kits.  Take for example, the Cookie Graveyard kit from Target.  It is easier to assemble than a house, but just as fun.  The kit contains a cookie base, cookie tombstones, icing, as well as bat, bone, and ghost decorations, in addition to other candies that can be used to help decorate the edible display.  If you can’t track down this particular kit, check for alternate versions at other retailers.  There are a ton to choose from!
CHOCOLATE CHILLS

While you may already have enough chocolate in your house during the Halloween season, you may still be tempted to get some more, especially when you can create your own candy concoctions!  Companies like Wilton produce a lot of chocolate molds and kits that function as great activities for the whole family. Spooky Chocolate Dipped Pretzels are just one example.
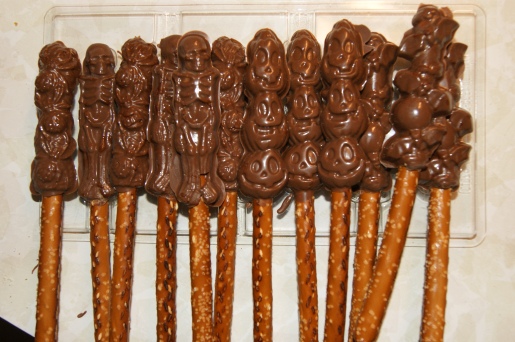
The kit includes everything you need to decorate your pretzel rods:  6 fun-shaped mold designs (4 Rat molds, 3 pumpkins, 3 bats, 3 spiders, and 3 skeleton molds), 16 oz. Wilton Candy Melts brand confectionery coating, 4 disposable decorating bags, 1 decorating brush, 20 pretzel bags with ties.  The only thing you will need to supply is the bag of jumbo pretzel rods.  (You may also want to buy some additional chocolate.)

All you need to do is stick the chocolate in a bag, put it in the microwave, squish the bag with your hands, and then pour into the molds.  Stick them in the fridge for about 30 minutes.  And voila; you have some awesome Halloween treats for all those special little boys and ghouls in your life!  What a terrific idea for parties!  And these would make great gifts for the office staff on Halloween day!

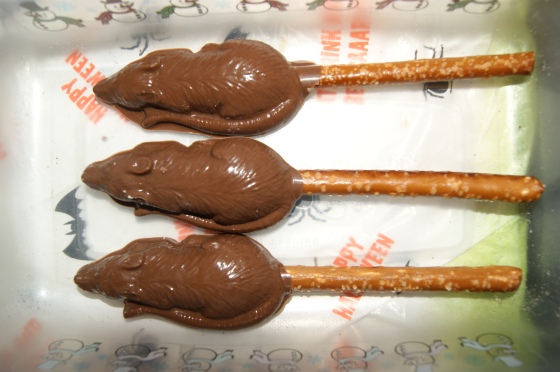
The best molds are definitely the rats.  These things are huge – and you get 4 rat molds, so you can make a whole family at one time.  The second best molds are the skeletons, followed the pumpkins.  The bats and spiders are fun, but my final versions didn’t turn out as great as the previously mentioned molds – though they are still pretty nifty.  Regardless, this kit is well worth the affordable price.  It makes for a great weekend activity to do with the kids or with yourself.  Plus, how can you beat the spooky, edible payoff?  The product is available to purchase at various locations: craft stores and other retailers.  And if you aren’t a fan of homemade chocolate creatures, there are plenty of other food craft kits out there – like the JELL-O Jigglers and the Rice Krispy Treat Pumpkins.
OTHER CRAFTY CREEPS

But not all craft projects come out of boxes, and Eek always wants to foster as much creativity as possible, so he suggests you head out to your local retailer to find materials for your next project.  Some craft shops sell Paper Mache.  Recently, Michael’s offered up miniature Paper Mache skulls.  Eek had a lot of fun with these and wanted to share some paint-scheme ideas to get you started:
1.  Paint the skulls the colors of your favorite sports teams.  Even consider painting a logo on the top!

2.  Paint your skull with a base color and then add “metalic” coloring for a shiny look.

3.  Give your skulls a classic Halloween treatment by painting them orange and black.

4.  Give your skulls a tie-dye look.

5.  Use stencils to add images to the top and back of the skulls.

Once you’re done, consider adding them to your current Halloween decor.  Or how about using them as table toppers or as party favors?  The possibilities are endless.

We will be adding to this page as we think of more activities, so why not subscribe to The Big Scare for the latest undead updates?
2013 Family Activities Guide for October and Halloween

0

eek's ideasOur friend, Eek the Owl, has shared with us some frighteningly fun ideas to make the Halloween season even more enjoyable.   He has the whole family covered: chefs, crafters, adventurers, and board game aficionados!  There’s something for everyone in our Halloween Family Activities Guide!  Feel free to take a gander and try out some of these activities with your family this Halloween season!  And be sure to subscribe to The Big Scare for even more ideas!

Any opinions expressed in the following article do not constitute an endorsement of any product or retailer.   The following is for information purposes only.  Any instructions are for information purposes only.  The Big Scare cannot guarantee you will experience the same results as we did should you opt to use these instructions.  Feel free to share ways to improve the instructions in the comments section below.  All activities should be conducted under adult supervision.

BEWITCHING BAKING

Our first wise idea involves everyone’s favorite holiday activity — baking.  And, as Eek points out, it’s not just for wintertime.  Halloween provides the opportunity to create all kind of creepy concoctions.  From cut-out cookies to brownies, they all make perfect October baking projects.

HALLOWEEN BROWNIES

While brownies are devilishly delicious by themselves, there’s just something even more appealing about a Halloween Brownie.  Making Halloween Brownies is just as easy as baking regular brownies.  You do exactly what your favorite recipe (or box) tells you to do, but you change up a few things before putting the batter in to bake.  Rather than just pouring the batter into a pan, you want to line the pan with greased aluminum foil.  Basically what you want to do is rip out a piece of baking foil and place it in your baking pan, pushing it up against the sides, making sure the whole thing (meaning the entire bottom and all the sides) is well covered.  Press the tin foil against the sides of the glass or metal pan so that it hugs it and assumes the pan’s shape.  Ensure that there is enough room left to lift the foil up out of the pan when the brownies have baked.  Then proceed to grease (and flour) it as you normally would or as you are instructed to in the baking directions, so as to prevent the brownies from sticking.  Bake the batter as directed.  Remove from the oven and let set until cool.

Rather than cut the brownies in the pan, you are going to remove the entire brownie cake, hence the foil.  Once cooled,  you can remove the brownie cake by lifting the sides of the aluminum foil or turning the pan upside down, a method preferable in cases of wide pans.  Place the brownies on a clean surface covered in powdered sugar and remove the foil lining.  Your brownie cake should have maintained its shape.  (If at anytime it appears that your brownie cake may be breaking, consider cutting the brownie cake in the pan and removing it in smaller portions.)

Now comes the fun part.  Take some open  Halloween cookie cutters (meaning ones that are just outlines that do not have tops which would prevent the cutter from cutting through thick brownies) and cover them in powdered sugar.  (Make sure your cookie cutters are deep enough to cut through the thick brownie cake.  You can buy these cookie cutters at a number of major retailers.  They usually come in “tubs.”)  Press each cookie cutter all the way through the brownie cake, just as you would with cookie cutters in cookie dough.  Carefully remove your brownie shape and place it aside.  Continue to press cutters into the remaining brownie cake until the area of usable brownie cake has been cut.  Take the cutout shapes and decorate them with frosting, powdered sugar and candies.  Use the “scrap” brownies, the unused edges that are leftover, to add layering and detail to your treats — or just eat them!

GRISLY GAME NIGHT

In a world seemingly run by electronic entertainment, it’s sometimes hard to remember that other forms of fun exist., like board games!  And when those board games have a Halloween theme, their fun level quadruples.

There are a number of Halloween-themed board games available on the market, and plenty more that can be purchased secondhand.  One of the easiest games to track down is Halloween Boo-Opoly.  Much like the game from which it derives its objective, Boo-Opoly allows players to buy properties, many of which will be familiar (like Elm Street) and many of which will be new (Gourd Walk).  The old railroads are now different creatures of the night, and the utilities consist of Jack-O’-Lanterns and Witch’s Brew.  Instead of houses and hotels, players may buy Haunted Houses and Full Moons.  The gameplay is quite similar to Monopoly, but there are some slight differences.  Overall, it’s a fun game with a nice design.  The only thing that would make it better would be if the playing pieces weren’t just plain plastic pawns, and instead were shaped in the forms of Halloween characters.

And if Boo-Opoly isn’t quite your game, there are plenty of other options.  From vampire games to zombie games, a trip to the local toy store is certain to reap a nice harvest of spooky entertainment — especially at Halloween.

FROM TRIP TO TREAT

WHAT’S IN A PATCH?

Most families pick up pumpkins from their local grocer (or the super-center which has invaded their neighborhood).  And while it is great to have access to affordably-priced pumpkins, there is just something missing from the experience.

So, while you may opt to get your larger carving-friendly produce from the grocery store, a trip to the local (or not-so-local) pumpkin patch should be in order for your family this year, even if you don’t make your big pumpkin purchase there.  Not only do many patches provide fresh, right-off-the-vine pumpkins, they also provide a ton of activities for your family.  The experience that pumpkin patches provide is unprecedented.  Many of them have games, hayrides, corn mazes, and photo opportunities that the grocery store can’t possibly match.

So, even if you can’t afford a large pumpkin from the patch, your family should still make a visit, maybe pick up some Indian Corn or smaller pumpkins, and take advantage of everything that is offered.  It will be a memory your family will never forget.

BAKED PUMPKIN SEEDS

Now that you have found the perfect pumpkin and are already to carve it, you probably are wondering what to do with all of those insides!  We have the perfect solution — for the seeds at least!

Here is our recipe for delicious baked pumpkin seeds…

1.  Immediately after carving your pumpkin, remove the seeds and rinse them thoroughly.  After they have been cleaned, pad them dry and let them sit for several hours in a warm place.

2. Preheat oven to 300 F.  Once the pumpkin seeds are completely dry, place them in a mixing bowl and add 1 tablespoon melted butter for every one cup of seeds.  Mix the seeds so that they are completely coated.

3.  Sprinkle in garlic powder and salt, enough to taste.  Mix until every seed has a light covering.

4.  Pour the seeds onto a foil-lined baking sheet.  Spread the seeds so that they form a single layer.  It is important not to have them overlapping.

5.  Place the seeds in the oven and let bake 50 minutes, mixing them every 15 minutes or so.

6.  Add additional seasoning as desired and enjoy!

CREEPY CRAFTS

BOX OF BOOS

FRIGHTENING FOAM

If you have ever wandered into an arts and crafts store in the fall, you have undoubtedly seen a variety of pre-packaged art projects that can be used to dreary up any bright October day.

Kid-friendly foam kits, which let you and your family create haunted scenes out of small pieces of pre-cut foam, are just one example.  The variety of these kits has really expanded in recent years, and now you can create all kinds of things: graveyards, haunted houses, masks, monster boxes, cars, and more!

A lot of these kits don’t actually require much skill.  Some come with foam stickers, meaning you don’t even have to glue anything!  That is why they are good for the younger set as well as the older crowd.  But each kit is different, so be sure to read the box for details before considering a purchase.

One of the nice things about these kits is that they allow for a lot of customization and personalization.  You have the freedom and ability to place characters and other scene-setters in a variety of places on the foam bases, while still maintaining the same structure suggested by the manufacturer.  You can even add your own foam pieces or mix pieces among a number of kits.

These kits get the whole family involved in the building process and make great decorations when finished.  And there are a variety of ways you can incorporate the kits into your Halloween festivities.  You can buy one to assemble with the kids on a stormy evening, you can buy a number and have a family foam-building contest, or you can have a variety available at a kids’ Halloween party, set up tables, and have the party-goers bring their own creations to life.

CREEPY COOKIES

Another great option is the Cookie Decorating Kit.  We all know the classic Gingerbread House kits that come out at Christmas.  In recent years, many manufacturers have introduced Halloween-themed kits.  Take for example, the Cookie Graveyard kit from Target.  It is easier to assemble than a house, but just as fun.  The kit contains a cookie base, cookie tombstones, icing, as well as bat, bone, and ghost decorations, in addition to other candies that can be used to help decorate the edible display.  If you can’t track down this particular kit, check for alternate versions at other retailers.  There are a ton to choose from!

CHOCOLATE CHILLS

While you may already have enough chocolate in your house during the Halloween season, you may still be tempted to get some more, especially when you can create your own candy concoctions!  Companies like Wilton produce a lot of chocolate molds and kits that function as great activities for the whole family. Spooky Chocolate Dipped Pretzels are just one example.

The kit includes everything you need to decorate your pretzel rods:  6 fun-shaped mold designs (4 Rat molds, 3 pumpkins, 3 bats, 3 spiders, and 3 skeleton molds), 16 oz. Wilton Candy Melts brand confectionery coating, 4 disposable decorating bags, 1 decorating brush, 20 pretzel bags with ties.  The only thing you will need to supply is the bag of jumbo pretzel rods.  (You may also want to buy some additional chocolate.)

All you need to do is stick the chocolate in a bag, put it in the microwave, squish the bag with your hands, and then pour into the molds.  Stick them in the fridge for about 30 minutes.  And voila; you have some awesome Halloween treats for all those special little boys and ghouls in your life!  What a terrific idea for parties!  And these would make great gifts for the office staff on Halloween day!

The best molds are definitely the rats.  These things are huge – and you get 4 rat molds, so you can make a whole family at one time.  The second best molds are the skeletons, followed the pumpkins.  The bats and spiders are fun, but my final versions didn’t turn out as great as the previously mentioned molds – though they are still pretty nifty.  Regardless, this kit is well worth the affordable price.  It makes for a great weekend activity to do with the kids or with yourself.  Plus, how can you beat the spooky, edible payoff?  The product is available to purchase at various locations: craft stores and other retailers.  And if you aren’t a fan of homemade chocolate creatures, there are plenty of other food craft kits out there – like the JELL-O Jigglers and the Rice Krispy Treat Pumpkins.

OTHER CRAFTY CREEPS

But not all craft projects come out of boxes, and Eek always wants to foster as much creativity as possible, so he suggests you head out to your local retailer to find materials for your next project.  Some craft shops sell Paper Mache.  Recently, Michael’s offered up miniature Paper Mache skulls.  Eek had a lot of fun with these and wanted to share some paint-scheme ideas to get you started:

1.  Paint the skulls the colors of your favorite sports teams.  Even consider painting a logo on the top!

2.  Paint your skull with a base color and then add “metalic” coloring for a shiny look.

3.  Give your skulls a classic Halloween treatment by painting them orange and black.

4.  Give your skulls a tie-dye look.

5.  Use stencils to add images to the top and back of the skulls.

Once you’re done, consider adding them to your current Halloween decor.  Or how about using them as table toppers or as party favors?  The possibilities are endless.

We will be adding to this page as we think of more activities, so why not subscribe to The Big Scare for the latest undead updates?

Telco Motion-ettes of Halloween: History and Collector’s Guide

8

Overview:

Photograph of Telco Box ArtBefore the late 1980s, Halloween decorating was mostly comprised of putting up ceramic jack-o’-lanterns, cardboard cutouts of ghosts, and the occasional lighted blow mold.  But, in 1986, one company developed an idea that forever changed the way haunters decorated their homes, for that was the year when Telco Creations introduced a revolutionary concept to the witching season: animation.  Nowadays, Americans take for granted that they can walk into any store to purchase an animatronic figure to “frighten up” their All Hallows’ displays.  Before Telco, that would have been impossible.  Telco Creations was renowned for its innovative Christmas decorations, and it only seemed an appropriate next step to tackle Halloween.  Thus, the Original Telco Motion-ettes of Halloween were born: the Witch, the Ghost, and the Scarecrow.  The line immediately expanded to include the Monster and the Vampire characters, as well as the Skeleton in the top hat.  Each tabletop figure stood 24” tall, sized to be reminiscent of the motorized holiday window displays for which department stores had always been known.  They featured head and arm movement, as well as illumination, and were powered by electricity.

Telco Bat _BigScare

By 1987, Telco Creations had introduced its line-up of groovy ghouls nationwide in retailers like  Woolworth and Kmart.  By 1988, the catalog was even more expansive, even including smaller (18″), battery-operated versions of the figures, each of which had lighted eyes and a spooky sounds.  (An intermediate line of figures followed.) The characteristics of the larger Motion-ettes morphed over time to include additional features like lighted heads and “life-like” audio.  In 1992, Telco joined forces with Universal Studios to create officially licensed monster Motion-ettes.  After this release, the larger, electric figures were phased out.  However, the smaller, battery-operated Halloween figures remained in stores through the end of the century.  This guide is intended to help you understand the development of the Motion-ette line and identify certain figures you may have seen.  If your question isn’t answered here, it may be addressed in our Telco Halloween Motion-ettes FAQ.  You may also be interested in our Fair Market Value Guide based upon our ten-year observations.

Editor’s Note:  The images on this page are archival images, many of which are over 25 years old.  In some cases, there are obvious defects in our particular copies of the images.  The Big Scare has done its best to present the best quality Telco stock, promotional, and catalog images for your reference, so as to provide you with the most accurate depiction of the products.  All information and images on this page are for educational purposes.

The Original Motion-ettes of Halloween

The first Telco Halloween figures are uniquely different from those that followed.  While all early Telco figures featured electric power, motion, and an accessory (usually illuminated), the first wave included figures with single-arm motion as opposed to the more common double-arm movement.  The figures were activated by a red button on the base, as opposed to the more common cord rotary switch.  Furthermore, the figures had a glossier, shinier finish.

Their accessories were also less standardized and, in the case of the Monster, more elegant.  Unlike later versions, the first Monster came equipped with a metal lantern.  Other differences include a more Karloffian head-sculpt and a lighter costume.  The other figure that experienced a major overhaul from its initial incarnation was the Ghost.  The first release looked like the classic “bed sheet” ghoul.  Later on, this spook received a glowing jack-o’-lantern head.  Its lighted skull accessory was also replaced with a cat (which was illuminated in some figures and not in others).  The Scarecrow later received a set of plastic arms and a sculpted head, though the cloth version returned for a brief stint in 1989.  The Skeleton only experienced a change of accessories.  For the most part, the design of the original Witch remained unchanged throughout the entire run of the line, as did that of the original Vampire.  While materials changed and additional features were added, these two were the most steadfast figures in the whole series, though it should be noted that the Vampire was given a range of accessories in addition to the traditional skull and later received a “glowing head.”

Awful Accessories

The Telco series of animated figures was unique in the fact that its figures had a variety of accessories.  The most commonly used accessories were skulls, pumpkins, plastic lanterns, and cats.  However, broomsticks, canes, pitchforks, and crows/ravens were also added to certain figures.  The most unique accessories would have to be the Witch’s crystal ball and the hard plastic bats and cobras (snakes).  The bat accessories were actually modeled after Telco’s own animated bat figure.

Chilling Changes

Devil Regular Head Sculpt - Telco Stock ImageBy the time 1988 rolled around, Telco had given most of its original characters makeovers, and it added new designs to the mix.  The Vampire Bat, “Wolfman” (Werewolf), Gorilla, and Devil all made their debuts in the 1988 catalog.  Each of these figures included a feature new to 24″ Motion-ettes: lighted eyes.  Depending on the character, the eyes either glowed red or orange.  In addition, Kmart carried an exclusive Witch (with an alternate head sculpt) and the Phantom of the Opera that year.  Both were distributed to other retailers the following year.  1988 was also the year that Telco introduced a feature that would later become a staple of the Halloween line: glowing heads.  The first figure to feature a fully illuminated head was the newly-designed Ghost Motion-ette.  His plastic jack-o’-lantern head turned side to side, while glowing bright orange.

From Bug Eyes to Glowing Heads: Telco Grows Up

 By 1989, Telco continued to expand its character offerings, introducing new characters such as the “Flying Wicked Witch” and a Grim Reaper.  And while the original six characters remained unaltered from the previous year’s makeover, the 1988 additions each received a new treatment.

The g1989 MAD DEVILlo1989 MAD WEREWOLFwing eyes on the Devil, Wolfman, and Vampire Bat were all replaced with sculpted eyes, though the resulting “bug eyes” made the characters look “crazed” and “mad,” making these versions less popular than the former glowing-eyed figures and far more rare on the secondary market.  While the glowing-eyed beasts can be purchased rather easily, the bug-eyed monsters don’t show up that often, and, when they do, they generally sell for 1.5 to 2 times the amount of their lighted-eye counterparts.  The Devil and Wolfman later received glowing heads.

In fact, in 1990, all of the Halloween Motion-ettes debuted with fully illuminated heads.  To make the new technology work, most of the figures’ heads were re-cast in lighter-colored plastic.  The Vampire and the Phantom of the Opera were now extremely pale, the Monster was now molded in yellow, and the Wolfman became green.  (This green “Wolfman” was later renamed the “Beast Man.”)  The Witch saw no change, which made the feature rather ineffective.  An alternate Witch also received the “glow” treatment.  Additionally, a new character was added to the catalog, this one based on the 1925 Universal picture, The Phantom of the Opera.  The figure was named “Red Death,” after the sequence in the film and the character in the Edgar Allan Poe short story.  By 1991, Telco streamlined its output, reducing the Halloween offerings to the glowing versions of the Witch, Vampire, Monster, and the Grim Reaper character (which now adopted the “Skeleton” moniker).  In its final effort to innovate, Telco added “life-like” sounds to its 24″ line.  The audio (usually cackling, laughing, or moaning) could be controlled by a switch on the base of the figures.

Inspirations and Imitations

The muse behind the designs of the Halloween figures has always been a bit of a mystery, but it is clear that Telco drew inspiration from  images of the classic monsters and assorted Halloween toys that were available at the time.  For example, comparing the head sculpts of the Telco Motion-ettes to 1980s Halloween masks is an interesting exercise.  The Devil sculpt has a lot in common with the “Be Something Studios” Lucifer mask from 1980.   The argument could be made for other characters as well (albeit with different mask companies).  But no one will ever really know if Halloween masks were the references used by the Telco team.  What is clear, though, is that designs of the Monster, Vampire, and Phantom all appear to be based on the characters portrayed by Boris Karloff, Christopher Lee, and Lon Chaney, Sr. respectively, making these innovative figures the first animated Halloween tributes to Horror films.

Because Telco’s idea was so successful, other companies immediately started production on their own lines of animated Halloween figures, all with the same basic features, many with eerily similar character designs, some with totally unique takes.   Competitors included Witchtime, Topstone, Rennoc (now Santa’s Best), EPI, and, of course, Gemmy — the current powerhouse in Halloween animation. Additional companies joined the holiday animation war, but they went as quickly as they came.

Something Different

By 1991, the market was so saturated with Halloween animation, Telco decided that it had to do something different.  The following year, it joined forces with Universal City Studios to create an official line of Motion-ettes modeled after the Universal Studios Monsters.  These Motion-ettes were the first ever animated Halloween figures to be licensed by a movie studio, thus inspiring a trend that would forever change Halloween decorating.

18" Universal Frankenstein (Alternate Coloring) Box ArtThe initial release of the Universal Monsters included the four main characters: Dracula, Frankenstein’s Monster, the Wolf Man, and the Creature from the Black Lagoon.  All of the characters received official head sculpts and costumes.  They were produced in both electric 21″ (instead of the regular 24″) and battery-operated 18″ formats (There were also 16″ variants).  Unlike their generic predecessors, they did not have lighted accessories, but they did include sound.  They were widely available at Wal-Mart, Kroger, and Meijer stores, as well as smaller retailers.  After the success of the first line, the Bride of Frankenstein and the Mummy were added; though, by this point, Telco’s focus had shifted to the more economical battery-operated 18″ line, making the last two difficult to come by in the larger size.  The 21″ version of the Mummy is the rarest of all Motion-ette figures, though he has surfaced on the secondary market.  It should also be noted that there were two versions of the Frankenstein Monster produced.  The first release came with a bright green paint application, while the second was released in a pasty, grayish green color.

Moving Forward

With so much competition, Telco’s decision to focus on its smaller, battery-operated line was a smart one and kept the Halloween figures in stores through the end of the 1990s.  For the most part, the character offerings remained limited.  After the Universal line, Telco returned to the traditional generic characters.  The 18″ line-up included the Vampire, the Monster, the Skeleton, and two versions of the Witch.  (To read more about the small line and the intermediate line, click here.)  Telco also released a few unique takes on these characters during this time: a Witch rising from a cauldron and a Grim Reaper rising from a chair.  The latter featured some of the most technologically advanced animation in Halloween decorating to that point.  It also featured a unique soundtrack with spoken dialogue and sound effects, a huge improvement over the previous “life-like” sound.  Telco folded shortly after the start of the new century due to factory problems, but its legacy lives on and today’s Halloween animatronic manufacturers owe Telco everything for paving the way for their success.

Have a question that wasn’t addressed in this guide?  Check out our Telco Halloween Motion-ettes FAQ!

Telco Motion-ettes of Halloween: History and Collector’s Guide

40

Overview:

Photograph of Telco Box ArtBefore the late 1980s, Halloween decorating was mostly comprised of putting up ceramic jack-o’-lanterns, cardboard cutouts of ghosts, and the occasional lighted blow mold.  But, in 1986, one company developed an idea that forever changed the way haunters decorated their homes, for that was the year when Telco Creations introduced a revolutionary concept to the witching season: animation.  Nowadays, Americans take for granted that they can walk into any store to purchase an animatronic figure to “frighten up” their All Hallows’ displays.  Before Telco, that would have been impossible.  Telco Creations was renowned for its innovative Christmas decorations, and it only seemed an appropriate next step to tackle Halloween.  Thus, the Original Telco Motion-ettes of Halloween were born: the Witch, the Ghost, and the Scarecrow.  The line immediately expanded to include the Monster and the Vampire characters, as well as the Skeleton in the top hat.  Each tabletop figure stood 24” tall, sized to be reminiscent of the motorized holiday window displays for which department stores had always been known.  They featured head and arm movement, as well as illumination, and were powered by electricity.

Telco Bat _BigScare

By 1987, Telco Creations had introduced its line-up of groovy ghouls nationwide in retailers like  Woolworth and Kmart.  By 1988, the catalog was even more expansive, even including smaller (18″), battery-operated versions of the figures, each of which had lighted eyes and a spooky sounds.  (An intermediate line of figures followed.) The characteristics of the larger Motion-ettes morphed over time to include additional features like lighted heads and “life-like” audio.  In 1992, Telco joined forces with Universal Studios to create officially licensed monster Motion-ettes.  After this release, the larger, electric figures were phased out.  However, the smaller, battery-operated Halloween figures remained in stores through the end of the century.  This guide is intended to help you understand the development of the Motion-ette line and identify certain figures you may have seen.  If your question isn’t answered here, it may be addressed in our Telco Halloween Motion-ettes FAQ.  You may also be interested in our Fair Market Value Guide based upon our ten-year observations.

Editor’s Note:  The images on this page are archival images, many of which are over 25 years old.  In some cases, there are obvious defects in our particular copies of the images.  The Big Scare has done its best to present the best quality Telco stock, promotional, and catalog images for your reference, so as to provide you with the most accurate depiction of the products.  All information and images on this page are for educational purposes.

The Original Motion-ettes of Halloween

The first Telco Halloween figures are uniquely different from those that followed.  While all early Telco figures featured electric power, motion, and an accessory (usually illuminated), the first wave included figures with single-arm motion as opposed to the more common double-arm movement.  The figures were activated by a red button on the base, as opposed to the more common cord rotary switch.  Furthermore, the figures had a glossier, shinier finish.

Their accessories were also less standardized and, in the case of the Monster, more elegant.  Unlike later versions, the first Monster came equipped with a metal lantern.  Other differences include a more Karloffian head-sculpt and a lighter costume.  The other figure that experienced a major overhaul from its initial incarnation was the Ghost.  The first release looked like the classic “bed sheet” ghoul.  Later on, this spook received a glowing jack-o’-lantern head.  Its lighted skull accessory was also replaced with a cat (which was illuminated in some figures and not in others).  The Scarecrow later received a set of plastic arms and a sculpted head, though the cloth version returned for a brief stint in 1989.  The Skeleton only experienced a change of accessories.  For the most part, the design of the original Witch remained unchanged throughout the entire run of the line, as did that of the original Vampire.  While materials changed and additional features were added, these two were the most steadfast figures in the whole series, though it should be noted that the Vampire was given a range of accessories in addition to the traditional skull and later received a “glowing head.”

Awful Accessories

The Telco series of animated figures was unique in the fact that its figures had a variety of accessories.  The most commonly used accessories were skulls, pumpkins, plastic lanterns, and cats.  However, broomsticks, canes, pitchforks, and crows/ravens were also added to certain figures.  The most unique accessories would have to be the Witch’s crystal ball and the hard plastic bats and cobras (snakes).  The bat accessories were actually modeled after Telco’s own animated bat figure.

Chilling Changes

Devil Regular Head Sculpt - Telco Stock ImageBy the time 1988 rolled around, Telco had given most of its original characters makeovers, and it added new designs to the mix.  The Vampire Bat, “Wolfman” (Werewolf), Gorilla, and Devil all made their debuts in the 1988 catalog.  Each of these figures included a feature new to 24″ Motion-ettes: lighted eyes.  Depending on the character, the eyes either glowed red or orange.  In addition, Kmart carried an exclusive Witch (with an alternate head sculpt) and the Phantom of the Opera that year.  Both were distributed to other retailers the following year.  1988 was also the year that Telco introduced a feature that would later become a staple of the Halloween line: glowing heads.  The first figure to feature a fully illuminated head was the newly-designed Ghost Motion-ette.  His plastic jack-o’-lantern head turned side to side, while glowing bright orange.

From Bug Eyes to Glowing Heads: Telco Grows Up

 By 1989, Telco continued to expand its character offerings, introducing new characters such as the “Flying Wicked Witch” and a Grim Reaper.  And while the original six characters remained unaltered from the previous year’s makeover, the 1988 additions each received a new treatment.

The g1989 MAD DEVILlo1989 MAD WEREWOLFwing eyes on the Devil, Wolfman, and Vampire Bat were all replaced with sculpted eyes, though the resulting “bug eyes” made the characters look “crazed” and “mad,” making these versions less popular than the former glowing-eyed figures and far more rare on the secondary market.  While the glowing-eyed beasts can be purchased rather easily, the bug-eyed monsters don’t show up that often, and, when they do, they generally sell for 1.5 to 2 times the amount of their lighted-eye counterparts.  The Devil and Wolfman later received glowing heads.

In fact, in 1990, all of the Halloween Motion-ettes debuted with fully illuminated heads.  To make the new technology work, most of the figures’ heads were re-cast in lighter-colored plastic.  The Vampire and the Phantom of the Opera were now extremely pale, the Monster was now molded in yellow, and the Wolfman became green.  (This green “Wolfman” was later renamed the “Beast Man.”)  The Witch saw no change, which made the feature rather ineffective.  An alternate Witch also received the “glow” treatment.  Additionally, a new character was added to the catalog, this one based on the 1925 Universal picture, The Phantom of the Opera.  The figure was named “Red Death,” after the sequence in the film and the character in the Edgar Allan Poe short story.  By 1991, Telco streamlined its output, reducing the Halloween offerings to the glowing versions of the Witch, Vampire, Monster, and the Grim Reaper character (which now adopted the “Skeleton” moniker).  In its final effort to innovate, Telco added “life-like” sounds to its 24″ line.  The audio (usually cackling, laughing, or moaning) could be controlled by a switch on the base of the figures.

Inspirations and Imitations

The muse behind the designs of the Halloween figures has always been a bit of a mystery, but it is clear that Telco drew inspiration from  images of the classic monsters and assorted Halloween toys that were available at the time.  For example, comparing the head sculpts of the Telco Motion-ettes to 1980s Halloween masks is an interesting exercise.  The Devil sculpt has a lot in common with the “Be Something Studios” Lucifer mask from 1980.   The argument could be made for other characters as well (albeit with different mask companies).  But no one will ever really know if Halloween masks were the references used by the Telco team.  What is clear, though, is that designs of the Monster, Vampire, and Phantom all appear to be based on the characters portrayed by Boris Karloff, Christopher Lee, and Lon Chaney, Sr. respectively, making these innovative figures the first animated Halloween tributes to Horror films.

Because Telco’s idea was so successful, other companies immediately started production on their own lines of animated Halloween figures, all with the same basic features, many with eerily similar character designs, some with totally unique takes.   Competitors included Witchtime, Topstone, Rennoc (now Santa’s Best), EPI, and, of course, Gemmy — the current powerhouse in Halloween animation. Additional companies joined the holiday animation war, but they went as quickly as they came.

Something Different

By 1991, the market was so saturated with Halloween animation, Telco decided that it had to do something different.  The following year, it joined forces with Universal City Studios to create an official line of Motion-ettes modeled after the Universal Studios Monsters.  These Motion-ettes were the first ever animated Halloween figures to be licensed by a movie studio, thus inspiring a trend that would forever change Halloween decorating.

18" Universal Frankenstein (Alternate Coloring) Box ArtThe initial release of the Universal Monsters included the four main characters: Dracula, Frankenstein’s Monster, the Wolf Man, and the Creature from the Black Lagoon.  All of the characters received official head sculpts and costumes.  They were produced in both electric 21″ (instead of the regular 24″) and battery-operated 18″ formats (There were also 16″ variants).  Unlike their generic predecessors, they did not have lighted accessories, but they did include sound.  They were widely available at Wal-Mart, Kroger, and Meijer stores, as well as smaller retailers.  After the success of the first line, the Bride of Frankenstein and the Mummy were added; though, by this point, Telco’s focus had shifted to the more economical battery-operated 18″ line, making the last two difficult to come by in the larger size.  The 21″ version of the Mummy is the rarest of all Motion-ette figures, though he has surfaced on the secondary market.  It should also be noted that there were two versions of the Frankenstein Monster produced.  The first release came with a bright green paint application, while the second was released in a pasty, grayish green color.

Moving Forward

With so much competition, Telco’s decision to focus on its smaller, battery-operated line was a smart one and kept the Halloween figures in stores through the end of the 1990s.  For the most part, the character offerings remained limited.  After the Universal line, Telco returned to the traditional generic characters.  The 18″ line-up included the Vampire, the Monster, the Skeleton, and two versions of the Witch.  (To read more about the small line and the intermediate line, click here.)  Telco also released a few unique takes on these characters during this time: a Witch rising from a cauldron and a Grim Reaper rising from a chair.  The latter featured some of the most technologically advanced animation in Halloween decorating to that point.  It also featured a unique soundtrack with spoken dialogue and sound effects, a huge improvement over the previous “life-like” sound.  Telco folded shortly after the start of the new century due to factory problems, but its legacy lives on and today’s Halloween animatronic manufacturers owe Telco everything for paving the way for their success.

Have a question that wasn’t addressed in this guide?  Check out our Telco Halloween Motion-ettes FAQ!

Spook Spotter: Don Post Studios Halloween III (Silver Shamrock) Masks

1
The following does not constitute an endorsement of any product or retailer.   It is for information purposes only.

It’s a last “Hoorah” for the most famous mask-maker of them all, Don Post.  Don Post Studios was recently dissolved when part of its parent company merged with Gemmy Industries.   While the fate of the delightful mask molds remains uncertain, one thing is clear: This is probably the last time we will get to see the “most famous masks of Halloween,” at least from their original creator.

Those masks, of course, are the Big Three from Halloween III: Season of the Witch.  While the film has received mixed reactions since its release, the masks have endured the test of time and have become almost as symbolic of the season as pumpkins and black cats.  These reproduction masks are a little different from the originals.  First, they are made of vinyl – not latex.  This means, they are not subject to the same hazards and could last longer, assuming they are treated well.  The next difference is the size and the paint.  These appear to be smaller than the originals and some have an altered paint application.  But, in person, the differences seem rather minute, especially to someone who may have wanted these masks for many years.

Retailing at around $57.00 each, they are a bit expensive.  But, considering that these could very well be the last creations from Don Post, this release is rather historic in the world of masks.  Because of the unusual conditions under which they were released, they are rather difficult to track down.  They have not, to our knowledge, made it to any physical retail locations.  However, limited quantities are available at various online retailers, including eBay.  If you are interested, securing an order in the near future may be in your best interest.

Halloween Activities Week: JELLO Halloween Mold Kit

5
The following does not constitute an endorsement of any product or retailer.   It is for information purposes only.

For years, Jello Jigglers have been a holiday treat enjoyed by young and old.  This year, however, Jello has released a ready-made family fun kit to help with the Jiggler-making process.

The Jello Jigglers Mold Kit is available at a variety of retailers, from supermarkets to Walmart.  It comes with almost everything you need to create your own Jack-O’-Lantern, Bat, and Ghost Jigglers.  Included is an orange rubber-like mold tray that yields six shapes, one 6 oz. package of grape gelatin dessert mix, and one 6 oz. package of orange gelatin dessert mix.  Cutout instructions are provided on the back of the box.

What are some other Halloween food kits you have seen this year?  Share your finds in the comments section below!

2013 Family Activities Guide for October and Halloween

1

eek's ideasOur friend, Eek the Owl, has shared with us some frighteningly fun ideas to make the Halloween season even more enjoyable.   He has the whole family covered: chefs, crafters, adventurers, and board game aficionados!  There’s something for everyone in our Halloween Family Activities Guide!  Feel free to take a gander and try out some of these activities with your family this Halloween season!  And be sure to subscribe to The Big Scare for even more ideas!

Any opinions expressed in the following article do not constitute an endorsement of any product or retailer.   The following is for information purposes only.  Any instructions are for information purposes only.  The Big Scare cannot guarantee you will experience the same results as we did should you opt to use these instructions.  Feel free to share ways to improve the instructions in the comments section below.  All activities should be conducted under adult supervision.

BEWITCHING BAKING

Our first wise idea involves everyone’s favorite holiday activity — baking.  And, as Eek points out, it’s not just for wintertime.  Halloween provides the opportunity to create all kind of creepy concoctions.  From cut-out cookies to brownies, they all make perfect October baking projects.

HALLOWEEN BROWNIES

While brownies are devilishly delicious by themselves, there’s just something even more appealing about a Halloween Brownie.  Making Halloween Brownies is just as easy as baking regular brownies.  You do exactly what your favorite recipe (or box) tells you to do, but you change up a few things before putting the batter in to bake.  Rather than just pouring the batter into a pan, you want to line the pan with greased aluminum foil.  Basically what you want to do is rip out a piece of baking foil and place it in your baking pan, pushing it up against the sides, making sure the whole thing (meaning the entire bottom and all the sides) is well covered.  Press the tin foil against the sides of the glass or metal pan so that it hugs it and assumes the pan’s shape.  Ensure that there is enough room left to lift the foil up out of the pan when the brownies have baked.  Then proceed to grease (and flour) it as you normally would or as you are instructed to in the baking directions, so as to prevent the brownies from sticking.  Bake the batter as directed.  Remove from the oven and let set until cool.

Rather than cut the brownies in the pan, you are going to remove the entire brownie cake, hence the foil.  Once cooled,  you can remove the brownie cake by lifting the sides of the aluminum foil or turning the pan upside down, a method preferable in cases of wide pans.  Place the brownies on a clean surface covered in powdered sugar and remove the foil lining.  Your brownie cake should have maintained its shape.  (If at anytime it appears that your brownie cake may be breaking, consider cutting the brownie cake in the pan and removing it in smaller portions.)

Now comes the fun part.  Take some open  Halloween cookie cutters (meaning ones that are just outlines that do not have tops which would prevent the cutter from cutting through thick brownies) and cover them in powdered sugar.  (Make sure your cookie cutters are deep enough to cut through the thick brownie cake.  You can buy these cookie cutters at a number of major retailers.  They usually come in “tubs.”)  Press each cookie cutter all the way through the brownie cake, just as you would with cookie cutters in cookie dough.  Carefully remove your brownie shape and place it aside.  Continue to press cutters into the remaining brownie cake until the area of usable brownie cake has been cut.  Take the cutout shapes and decorate them with frosting, powdered sugar and candies.  Use the “scrap” brownies, the unused edges that are leftover, to add layering and detail to your treats — or just eat them!

GRISLY GAME NIGHT

In a world seemingly run by electronic entertainment, it’s sometimes hard to remember that other forms of fun exist., like board games!  And when those board games have a Halloween theme, their fun level quadruples.

There are a number of Halloween-themed board games available on the market, and plenty more that can be purchased secondhand.  One of the easiest games to track down is Halloween Boo-Opoly.  Much like the game from which it derives its objective, Boo-Opoly allows players to buy properties, many of which will be familiar (like Elm Street) and many of which will be new (Gourd Walk).  The old railroads are now different creatures of the night, and the utilities consist of Jack-O’-Lanterns and Witch’s Brew.  Instead of houses and hotels, players may buy Haunted Houses and Full Moons.  The gameplay is quite similar to Monopoly, but there are some slight differences.  Overall, it’s a fun game with a nice design.  The only thing that would make it better would be if the playing pieces weren’t just plain plastic pawns, and instead were shaped in the forms of Halloween characters.

And if Boo-Opoly isn’t quite your game, there are plenty of other options.  From vampire games to zombie games, a trip to the local toy store is certain to reap a nice harvest of spooky entertainment — especially at Halloween.

FROM TRIP TO TREAT

WHAT’S IN A PATCH?

Most families pick up pumpkins from their local grocer (or the super-center which has invaded their neighborhood).  And while it is great to have access to affordably-priced pumpkins, there is just something missing from the experience.

So, while you may opt to get your larger carving-friendly produce from the grocery store, a trip to the local (or not-so-local) pumpkin patch should be in order for your family this year, even if you don’t make your big pumpkin purchase there.  Not only do many patches provide fresh, right-off-the-vine pumpkins, they also provide a ton of activities for your family.  The experience that pumpkin patches provide is unprecedented.  Many of them have games, hayrides, corn mazes, and photo opportunities that the grocery store can’t possibly match.

So, even if you can’t afford a large pumpkin from the patch, your family should still make a visit, maybe pick up some Indian Corn or smaller pumpkins, and take advantage of everything that is offered.  It will be a memory your family will never forget.

BAKED PUMPKIN SEEDS

Now that you have found the perfect pumpkin and are already to carve it, you probably are wondering what to do with all of those insides!  We have the perfect solution — for the seeds at least!

Here is our recipe for delicious baked pumpkin seeds…

1.  Immediately after carving your pumpkin, remove the seeds and rinse them thoroughly.  After they have been cleaned, pad them dry and let them sit for several hours in a warm place.

2. Preheat oven to 300 F.  Once the pumpkin seeds are completely dry, place them in a mixing bowl and add 1 tablespoon melted butter for every one cup of seeds.  Mix the seeds so that they are completely coated.

3.  Sprinkle in garlic powder and salt, enough to taste.  Mix until every seed has a light covering.

4.  Pour the seeds onto a foil-lined baking sheet.  Spread the seeds so that they form a single layer.  It is important not to have them overlapping.

5.  Place the seeds in the oven and let bake 50 minutes, mixing them every 15 minutes or so.

6.  Add additional seasoning as desired and enjoy!

CREEPY CRAFTS

BOX OF BOOS

FRIGHTENING FOAM

If you have ever wandered into an arts and crafts store in the fall, you have undoubtedly seen a variety of pre-packaged art projects that can be used to dreary up any bright October day.

Kid-friendly foam kits, which let you and your family create haunted scenes out of small pieces of pre-cut foam, are just one example.  The variety of these kits has really expanded in recent years, and now you can create all kinds of things: graveyards, haunted houses, masks, monster boxes, cars, and more!

A lot of these kits don’t actually require much skill.  Some come with foam stickers, meaning you don’t even have to glue anything!  That is why they are good for the younger set as well as the older crowd.  But each kit is different, so be sure to read the box for details before considering a purchase.

One of the nice things about these kits is that they allow for a lot of customization and personalization.  You have the freedom and ability to place characters and other scene-setters in a variety of places on the foam bases, while still maintaining the same structure suggested by the manufacturer.  You can even add your own foam pieces or mix pieces among a number of kits.

These kits get the whole family involved in the building process and make great decorations when finished.  And there are a variety of ways you can incorporate the kits into your Halloween festivities.  You can buy one to assemble with the kids on a stormy evening, you can buy a number and have a family foam-building contest, or you can have a variety available at a kids’ Halloween party, set up tables, and have the party-goers bring their own creations to life.

CREEPY COOKIES

Another great option is the Cookie Decorating Kit.  We all know the classic Gingerbread House kits that come out at Christmas.  In recent years, many manufacturers have introduced Halloween-themed kits.  Take for example, the Cookie Graveyard kit from Target.  It is easier to assemble than a house, but just as fun.  The kit contains a cookie base, cookie tombstones, icing, as well as bat, bone, and ghost decorations, in addition to other candies that can be used to help decorate the edible display.  If you can’t track down this particular kit, check for alternate versions at other retailers.  There are a ton to choose from!

CHOCOLATE CHILLS

While you may already have enough chocolate in your house during the Halloween season, you may still be tempted to get some more, especially when you can create your own candy concoctions!  Companies like Wilton produce a lot of chocolate molds and kits that function as great activities for the whole family. Spooky Chocolate Dipped Pretzels are just one example.

The kit includes everything you need to decorate your pretzel rods:  6 fun-shaped mold designs (4 Rat molds, 3 pumpkins, 3 bats, 3 spiders, and 3 skeleton molds), 16 oz. Wilton Candy Melts brand confectionery coating, 4 disposable decorating bags, 1 decorating brush, 20 pretzel bags with ties.  The only thing you will need to supply is the bag of jumbo pretzel rods.  (You may also want to buy some additional chocolate.)

All you need to do is stick the chocolate in a bag, put it in the microwave, squish the bag with your hands, and then pour into the molds.  Stick them in the fridge for about 30 minutes.  And voila; you have some awesome Halloween treats for all those special little boys and ghouls in your life!  What a terrific idea for parties!  And these would make great gifts for the office staff on Halloween day!

The best molds are definitely the rats.  These things are huge – and you get 4 rat molds, so you can make a whole family at one time.  The second best molds are the skeletons, followed the pumpkins.  The bats and spiders are fun, but my final versions didn’t turn out as great as the previously mentioned molds – though they are still pretty nifty.  Regardless, this kit is well worth the affordable price.  It makes for a great weekend activity to do with the kids or with yourself.  Plus, how can you beat the spooky, edible payoff?  The product is available to purchase at various locations: craft stores and other retailers.  And if you aren’t a fan of homemade chocolate creatures, there are plenty of other food craft kits out there – like the JELL-O Jigglers and the Rice Krispy Treat Pumpkins.

OTHER CRAFTY CREEPS

But not all craft projects come out of boxes, and Eek always wants to foster as much creativity as possible, so he suggests you head out to your local retailer to find materials for your next project.  Some craft shops sell Paper Mache.  Recently, Michael’s offered up miniature Paper Mache skulls.  Eek had a lot of fun with these and wanted to share some paint-scheme ideas to get you started:

1.  Paint the skulls the colors of your favorite sports teams.  Even consider painting a logo on the top!

2.  Paint your skull with a base color and then add “metalic” coloring for a shiny look.

3.  Give your skulls a classic Halloween treatment by painting them orange and black.

4.  Give your skulls a tie-dye look.

5.  Use stencils to add images to the top and back of the skulls.

Once you’re done, consider adding them to your current Halloween decor.  Or how about using them as table toppers or as party favors?  The possibilities are endless.

We will be adding to this page as we think of more activities, so why not subscribe to The Big Scare for the latest undead updates?